Monday, December 5, 2022

Monday Montage #226: Sneak Peek!!!


Hello stampin' friends!  Today I have a sneak peek from the upcoming January-April Mini Catalog.  The bundle I'm using is called Sweet Citrus.  In this bundle- there is the Sweet Citrus Stamp Set and the Sweet Citrus Hybrid Embossing Folder.  It. Is. Amazing.


The Sweet Citrus Hybrid Embossing Folder is just gorgeous!  The embossing folder itself has a lot of texture and the images come out looking amazing.  I love the definition that this simple step creates.  As the embossing folder is a hybrid- there are also dies that cut out the images as well.  


To create the citrus pieces- I first stamped the rinds in Daffodil Delight Ink.  Then I stamped the centers in Daffodil Delight Ink- stamped the color off one time and then used a Stampin' Blending Brush to add a little hint of Polished Pink Ink.  
The leaf images were stamped using Soft Seafoam Ink.  

Thanks for stopping by!  Please be sure to click the links below to navigate throughout the hop!  BACK will take you to Cheryl Curtis and NEXT to Elizabeth Price.  


Monday, October 17, 2022

Monday Montage #224


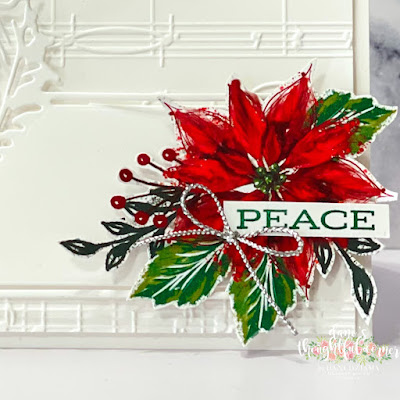
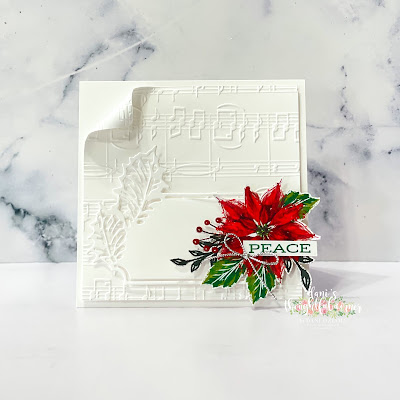
Hello stampin' friends!  Don't you just love the Leaves of Holly Stamp Set?  I've only owned it a few short weeks but it's become a favorite!  It comes in a few different ways- in a product bundle (stamps/dies) or the suite- which includes a ton of awesome products!  
Today- I have used the stamp set and coordinating Boughs Of Holly DSP.  This paper is absolutely gorgeous!  The colors are so rich and vibrant!  When paired with only Basic White- they pop!


This card measures 4-1/4" square.  I embossed a 4" square Basic White layer with the Merry Melody 3D Embossing Folder and curled the upper left corner.  The beautiful poinsettia image was fussy cut from the Boughs of Holly DSP and layered upon the rectangular holly leaf frame.


Thanks for stopping by!  Please be sure to click the links below to navigate throughout the hop!  BACK will take you to Cheryl Curtis and NEXT to Elizabeth Price.  


Monday, September 26, 2022

Monday Montage #223


Hello stampin' friends!  Welcome back to another Monday Montage Blog Hop!  Today I'm sharing a super fun Halloween Card.  This card was created using the Sequins Dies and the Scary Cute Bundle (Scary Cute Stamp Set and coordinating Scary Silhouettes dies).


This card was super simple to create.  I began by die cutting 8 Basic Black and 8 Pumpkin Pie sequins (I used the Sequins Dies-the second to the smallest size that has 6 in a row).  Next- I arranged them in a square onto a piece of Basic White Card Stock.  Using the Basic Black Stampin' Write Marker- I added some black ink specks.


I cut 2 small and 1 medium size bats using the Scary Silhouettes Dies and adhered them to 3 Pumpkin Pie Sequins.  I then wrapped a piece of White Baker's Twine (Baker's Twine Essentials Pack) around the card front in between the bottom 2 layers of sequins and tied a bow to the left side of the card.  Next- the Halloween Happiness sentiment was stamped in Tuxedo Black Memento Ink onto a Basic White scrap and cut apart.  It was adhered just just above and in between the bottom two rows of sequins.  Embellished with some Pearl Basic Jewels.

Thanks for stopping by!  Please be sure to click the links below to navigate throughout the hop!  BACK will take you to Cheryl Curtis and NEXT to Elizabeth Price.  


Monday, September 12, 2022

Monday Montage #222


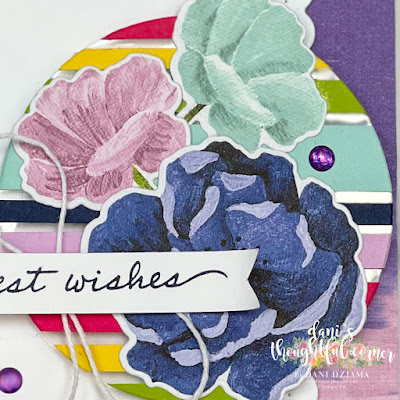
Hello stampin' friends!  Welcome back to another Monday Montage Blog Hop!  Today's card features one of my favorite Product Suites:  Hues of Happiness.  
I love this suite because of the bright happy colors.  They remind me of warm weather, sunshine and all things summer.  Sadly summer is coming to a close but that's ok- this set is timeless!


The striped circle is actually a floating element.  If you've not tried this technique- I recommend it!  It's simple and really adds a fun element to the project.  Below is a close up- it's actually difficult to get the full effect of it as in between the stripes looks metallic but it's not.  The stripes are actually on a Window Sheet.  


Thanks for stopping by!  Please be sure to click the links below to navigate throughout the hop!  BACK will take you to Cheryl Curtis and NEXT to Elizabeth Price.  


Monday, August 29, 2022

Monday Montage Blog Hop #221


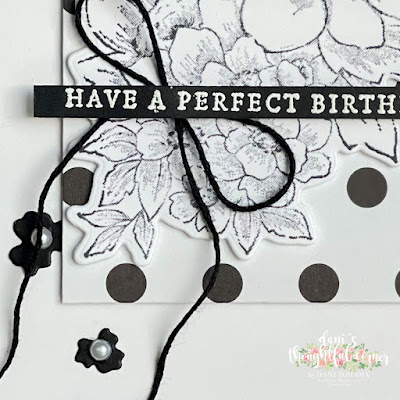
Hello stampin' friends!  Welcome back to another Monday Montage Blog Hop!  Today's card features the gorgeous Blessings Of Home Bundle.  I've actually had this bundle for quite a while but had never used it.  I'm not sure why as it's a beautiful set!


Do you love black/white cards?  They are some of my favorites to create.  They can be styled anywhere from basic to elegant.  They are perfect for so many occasions!  Birthday's, weddings, anniversaries, etc...


Thanks for stopping by!  Please be sure to click the links below to navigate throughout the hop!  BACK will take you to Cheryl Curtis and NEXT to Elizabeth Price.  


Monday, August 1, 2022

Monday Montage #219


Hello stampin' friends!  Can you believe it's already August 1st?  Christmas will be here in 4 short months and I've got a lot of cards to make before then!  Today I'm sharing a card that I created using the Santa's Delivery Bundle.  


This bundle is so cute and perfect to create Christmas cards for kids.  Nothing fancy on this card just lots of fun elements!  The train is colored with Petal Pink, Smoky Slate and Daffodil Delight Stampin' Blends.  Santa is sporting a Poppy Parade suit complete with Granny Apple Green mittens and there's an adorable tree and a bundle of presents.  All have been colored using Poppy Parade/Granny Apple Green Stampin' Blends.


The Basic White background was first embossed using the Charming Landscapes Embossing Folders.  I then used a Water Painter and Daffodil Delight ink to color the stars on the embossed background.  

Thanks for stopping by!  Please be sure to click the links below to navigate throughout the hop!  BACK will take you to Cheryl Curtis and NEXT to Elizabeth Price.  


Friday, July 29, 2022

TGIF Challenges: Back To School


Hello Friends! Today I'm playing along with the TGIF Challenges Design Team. We are sharing projects with a "back to school" theme.  This was a little tough for me as I don't have anything that's really "meant" for back to school.  Afterall- my kids are grown!


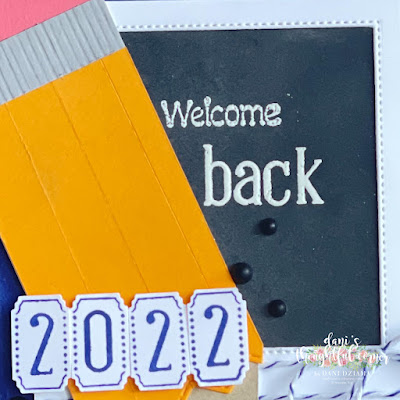
My card today features a giant pencil on a chalkboard frame.  If you look close-  you'll notice that the chalkboard is messy.  I always remember going to school and seeing the chalkboards all chalky.  To get this effect on card-I used the Embossing Buddy from the Embossing Additions Took Kit to "chalk" the background before stamping and heat embossing on it.


I also created a giant pencil to go along with the chalkboard.  To do this- I simply sketched out how I thought a big pencil would look onto a piece of Basic White Card Stock.  I cut the sketch out to use as a template.  The eraser was made using Flirty Flamingo Card Stock, the metal piece that attaches the pencil eraser and the pencil was created using Smoky Slate Card Stock.  The pencil body was created by first cutting a piece of Mango Melody Card Stock the same size as the pencil.  Then I used the chevron die from the Basic Borders Dies on the bottom end  to give the pencil the appearance of being "sharpened".  The pencil body was then cut into strips (to give the appearance of ridges) and adhered to the template.  The sharpened pencil point was created using Crumb Cake Card Stock and the point was colored in using the Black Dark Stampin' Blend.


As I was having difficulty coming up with stamps to match the theme of this card I chose to add the year 2022 to the pencil using the Alphabest Stamp Set and coordinating Best Label Punch.  Images were stamped using Starry Sky Classic Ink.


Why not join in on the fun and create a card of your own?  Simply create a card using the above sketch and submit it on the TGIF Challenges blog using the guidelines below!

Deadline for challenges is Thursday 8/4/2022 at 10am PST.


  • Uploaded projects need to be direct linked to your blog, Facebook, or other on line gallery.
  • Please post the TGIF Challenge graphic on your blog and link back to our site
  • Your project MUST be new and inspired by our challenge parameters
  • When sharing your project publicly, please use this weeks hashtag- #TGIFC379
  • Winning project(s) will be posted on next week's challenge on Friday 8/5/2022
  • Questions should be left in the comment section
  • Challengers can even post your cards on our FB page too!!  "Like us" while you're there :-)


Monday, July 18, 2022

Monday Montage #218 Merry Christmas


Hello stampin' friends! Welcome back for the Monday Montage Blog Hop!  It's Christmas in July here in my studio so I figured I might as well share another Christmas card!  
This one features the Decorated With Happiness Bundle.  I LOVE this bundle because it reminds me of vintage Christmas.  Mercury glass ornaments and bright fun colors.


For this card- I have created a trio of mercury glass ornaments.  To do this- I used Melon Mambo, Daffodil Delight and Bermuda Bay Stampin' Blends, Vellum and 91% alcohol.  I first scribbled onto the Vellum with the Stampin' Blends.  Next- I added a little bit of alcohol and used a straw to blow the alcohol/ink mixture around.  After the Vellum was dry- I stamped each ornament in Versamark Ink and embossed it in Silver from the Metallics Embossing Powders.  

Here's a close up view of a few details on the card.   The pictures aren't the best as it was extremely rainy today her in Ohio.    


Thanks for stopping by!  Please be sure to click the links below to navigate throughout the hop!  BACK will take you to Cheryl Curtis and NEXT to Elizabeth Price.  


Friday, July 15, 2022

TGIF Challenges #377: Christmas in July!


Hello Friends! Today I'm playing along with the TGIF Challenges Design Team. It's Christmas in July!  I'm still in the mode of non-traditional colors for the holidays!  LOVE bright fun colors for Christmas.


My card today features the Jingle Jingle Jingle Stamp Set.  For some reason- this set speaks to me.  I love it's sentiments and that there are cute images to coordinate.  I used the outline of the word Jolly as my background, then cut up the 'tis the season to be sentiment.  The script Jolly is from the Santa Express Memories &More Card Pack.  It actually comes as a chipboard piece and it can be colored any way to suite your project.  


The snowflakes are from the Spruced Up Stamp set and coordinating Spruced Up Outlines Dies.  The DSP Frame was created using the Stitched Rectangles Dies, Scalloped Contours Dies and some Celebrate Everything DSP.

Why not join in on the fun and create a card of your own?  Simply create a card using the above sketch and submit it on the TGIF Challenges blog using the guidelines below!

Deadline for challenges is Thursday 7/21/2022 at 10am PST.


  • Uploaded projects need to be direct linked to your blog, Facebook, or other on line gallery.
  • Please post the TGIF Challenge graphic on your blog and link back to our site
  • Your project MUST be new and inspired by our challenge parameters
  • When sharing your project publicly, please use this weeks hashtag- #TGIFC377
  • Winning project(s) will be posted on next week's challenge on Friday 7/22/2022
  • Questions should be left in the comment section
  • Challengers can even post your cards on our FB page too!!  "Like us" while you're there :-)


Thursday, July 14, 2022

OSAT Blog Hop: Time to Sale-a-brate

Good morning stampin' friends!  Today's projects were created for the One Stamp At A Time Blog Hop.  Today we are Sale-a-brating!  We are creating projects using products from the new Sale-a-bration 
brochure.  
My card today features the Tree Lot Dies.  These dies are so versatile!  They coordinate with the Trees For Sale Stamp Set in the July-December Mini Catalog however I chose to use them with the Scary Cute Stamp Set.


To create my card- I began by making a mask with a circle cut out of the center.  I then used a Blending Brush and some Daffodil Delight Ink to create the moon.  Next- I covered up the moon so that the remaining background could be colored with Starry Sky Ink.  After the background was colored- I cut another template using the cloud border from the Basic Borders Dies.  One by one- I carefully used a blending brush in Tuxedo Black Memento Ink to add a few clouds.  Then I added more clouds using the Starry Sky Ink only this time I made some really dark and some lighter colored ones.  


This card also features a shaker feature in the camper.  Tiny bats were cut from the Scary Silouhettes Dies and mixed with the For Everything Fancy Sequins.  As I was keeping within a specific color scheme I only selected sequins that were silver, iridescent glitter, iridescent gems.


My 3D project is a gift card holder.  It features a witch's hat clip.  These witch hat clips were super popular several years ago but I loved them so much back then that I decided to remake it again.  The actual gift card holder was created using the Mini Pocket Envelope Dies.  I love these dies for a variety of reasons.  They are gift card sized, perfect for cash or a little card.  They can even be used to hold small treats!  Perfect for trick or treaters!


Thanks for stopping by!  Please follow along on our hop by clicking on the links below.


Sunday, July 10, 2022

A Note Of Thanks


Good afternoon!  Did you notice the Tree Rings Hybrid Embossing Folder in the July-December Mini Catalog?   It's on page #62.  It. Is. Fabulous.  I can't believe I almost missed it!  It's quickly becoming a favorite in my craft room.  


My card today looks complicated but it's really not.  I began with a Crumb Cake Card Stock base.  To make the tree rings stand out more- I used Crumb Cake Ink and inked up the portion of the Tree Rings Hybrid Embossing Folder shown below.  (the Stampin' UP! Logo side )


Next- Using the Rings of Love DSP from Sale-A-Bration- I cut five 1" x 3-1/2" strips of plaid DSP and then layered them onto the card base slanting each one a different way.
The Tree Rings I used for the main focal point were created the same way the card base only this time- I also used the Tree Rings Die (and a different color- Soft Suede) along with the Embossing Folder to die cut each ring.  

I added a few leafy bits and some leaves with berries to add interest.  I embellished the card with Linen Thread Bow, a heart and some Pearl Basic Jewels.


Thanks for stopping by!