Tuesday, July 31, 2012

FREE HOWL-O-WEEN OFFER!!!

Starting August 1, you can get this Howl-O-Ween Printer's tray kit absolutely FREE when you join my team!  This kit is NOT available anywhere else!  Isn't it adorable?  I LOVE IT!

With the holidays rapidly approaching, now is a great time to join my team!  The starter kit is only $99 and you get to choose up to $125 worth of product!  The starter kit is COMPLETELY customizable so YOU pick the products that you want!  You will also receive a pack of Stampin' Up! business supplies to help you get started!  There is no additional shipping charge for your kit!  PLUS- you get the fabulous Halloween Printer's Tray kit absolutely FREE!  Call me at (734) 497-8521 or email me and I'll be happy to answer any questions you might have! 

Monday, July 30, 2012

Last Chance!

Tomorrow, July 31st, is your last chance to purchase the Reason to Smile stamp set.  This beautiful set can be yours for just $5 with any $50 purchase.  It's a limit of one per person.  Get yours before it's too late!
Reason to Smile
Here is a sample that I made with my set.
Call me (734-497-8521) to place your order or visit my online store today (the link is in the right sidebar)!
Card Ingredients:
Cardstock: Pacific Point, Whisper White
Inks:  Pacific Point, Melon Mambo, Pumpkin Pie
Stamp Set:  Reason to Smile, Lovely Little Labels
Embellishments:  1/2" Scallop Dots Ribbon in Melon Mambo, Whisper White Bakers Twine, Pearl Basic Jewels
Tools:  Big Shot, Little Labels Punch Pack, Paper Trimmer, Paper Snips, Glue Dots, Stampin' Dimensionals, SNAIL, Beautiful Wings Embosslits

Sunday, July 29, 2012

Hi and thanks for checking in!  Hopefully everyone is enjoying their Sunday.
Today I have a card that I was really unsure about when I started but think it ended up really cute!
What do you get when you use Summer Starfruit, Island Indigo, Crumb Cake, Whisper White and some Birds of a Feather DSP?  

Voila!  You get this!
A simple yet very cute look!  
Card Ingredients:
Cardstock:  Summer Starfruit, Island Indigo, Whisper White
DSP:  Birds of a Feather
Inks:  Crumb Cake, Summer Starfruit, Island Indigo
Stamp Set:  Flock Together, Petite Pairs
Embellishments:  3/8" Whisper White Taffeta Ribbon

Friday, July 27, 2012

Finally! It's Friday!

Good Evening!  Friday's are my favorite day of the week!  This week been a long week.  Ok, so all the weeks are the same length but for some reason- this week seemed to drag on.  I didn't have a lot of stampin' time today but I have a quick card to share.  I love that the cat is created by using a bunch of random Halloween themed words.  Too cute!

Card Ingredients:
Cardstock:  Basic Black, Tangerine Tango, Whisper White, Basic Gray
DSP:  Howlstooth & Scaringbone
Stamp:  Frightening Feline
Ink:  Basic Black
Embellishments:  1/2" Striped Satin Ribbon
Tools:  Paper Trimmer, Paper Snips, SNAIL, Stampin' Dimensionals

Thursday, July 26, 2012

Good Evening!  I wasn't very motivated today so all I have to show you is the rest of the box set we made at   my "Come Stamp with me Tuesday's" class.

On Tuesday, I showed you the box and one card.  The complete set consists of a standard A2 box and three cards.
All were very simple to make and didn't require much time to assemble.  As for the A2 box- the trickiest part about that was the Flocked Window Sheet scoring/folding.  I've not used Flocked Window Sheets very much so I wasn't sure if it would crack when I scored/folded it.  Fortunately- the window sheets are actually rather durable and hold up nicely!  No cracks at all!  And they look BEAUTIFUL!  I absolutely LOVE the color combination of Early Espresso, Lucky Limeade, Real Red, and Very Vanilla.
Card #1:

Card #2:

Card #3

All together:

What do you think?


Tuesday, July 24, 2012

Way late!

WOW!  I didn't want to wait this late to post BUT I've been busy!
Tonight I created several projects however I am only going to show 2.  I made a standard A2 card box to hold beautiful Christmas cards.  This is one of the cards I made.  I wasn't sure how I felt about it at first, but I really like it!

Card Ingredients:
Cardstock:  Very Vanilla, Early Espresso, Lucky Limeade
DSP:  Candlelight Christmas
Stamp Set:  Ornament Keepsakes
Inks:  Early Espresso, Real Red
Embellishments:  Rhinestone Basic Jewels, 1/2" Very Vanilla Seam Binding Ribbon
Tools:  Big Shot, Holiday Ornaments Framelits, Curly Label Punch, Bone Folder, Paper Snips, Paper Trimmer, Stamping Sponges, Stampin' Dimensionals, SNAIL

A2 Box Ingredients:
Cardstock:  Early Espresso
DSP:  Candlelight Christmas (Flocked Window Sheet)
Embellishments:  1/2" Very Vanilla Seam Binding Ribbon
Tools:  Paper Trimmer, Paper Snips, Simply Scored Scoring Tool, Sticky Strip


Two-Fer Tuesday!

I wanted to give you a heads up that today's Two-Fer Tuesday pictures will be posted this evening.  I will share what we made at the "Come Stamp with me Tuesaday's" class. 

I hope you are all having a wonderful day!  Even though I don't have any stamping related pictures to share right now- I figured I'd leave you with this picture of random cuteness.  His name is Jake and he LOVES to sleep in my Stampin' Up! order boxes.


Monday, July 23, 2012

Monday

Good Morning!  
I'm a little delayed on posting today's card but I finally have it ready!  I was looking to create a card that wasn't overly fancy but was still nice.  I came up with the card below:


Card Ingredients:
Cardstock:  Island Indigo, Whisper White, Pool Party
Ink:  Island Indigo, Pool Party, Lucky Limeade
Stamp Sets:  Pennant Parade, Just Believe (thank you sentiment)
Embellishments:  Island Indigo Bakers Twine
Tools:  Stamp-a-ma-jig, 1/2" Circle Punch, Petite Pennants Builder Punch, Paper Snips, Paper Trimmer, Stampin' Dimensionals, SNAIL

Saturday, July 21, 2012

Come Stamp with me Tuesdays!

I would like to invite fellow Stampers  in the Monroe, MI and surrounding area to come stamp with me every Tuesday at 6:30pm. Come try out the new products, create cards and have FUN!  Please EMAIL me if you would like to attend and I will send you my address!   (The email me button is located on the right sidebar)  Hope to see you there!

Not-So-Lazy Saturday!

Good Morning!  Since the temps are going to be sneaking back up into the 90's tomorrow and several days next week, I figured I'd better get some house cleaning and other important stuff done.  I prefer to spend my HOT days inside stamping!

I have a Thank You card to show you today.  It's made from a color combination that's bright and fun!
Hope you all have a great weekend!

Card Ingredients:
Cardstock:  Rich Razzleberry, Baja Breeze, Whisper White
DSP:  Floral District
Stamp Set:  Lacey & Lovely
Inks:  Baja Breeze, Daffodil Delight, Rich Razzleberry
Embellishments:  Antique Brads
Tools:  Big Shot, Blossom Punch, Finishing Touches Edgelits, Paper Piercing Tool, SNAIL, Delicate Doilies Sizzlits L Die

Friday, July 20, 2012

Friday Fun!

A few days ago, I shared a card that featured the Owl Occasions Stamp Set from the 2012 Holiday Catalog.  I had mentioned that it could be used for all occasions so today I have a card to share using the same stamp set but different card stock and embellishments.  This time- I made a Birthday card.


I apologize for the shadows.  My photography skills aren't as good as I'd like them to be!
I hope you enjoy!
Card Ingredients:
Cardstock: Rich Razzleberry, Daffodil Delight, Baja Breeze
DSP:  Floral District
Ink:  Chocolate Chip, Rich Razzleberry, Lucky Limeade, Rose Red
Embellishments:  Baja Breeze Seam Binding Ribbon, Pearl Basic Jewels
Tools:  Big Shot, Apothecary Accent Framelits, Labels Collection Framelits, Paper Piercing Tool, Essentials Paper-Piercing Pack, Paper Snips, Stampin' Dimensionals, SNAIL

Wednesday, July 18, 2012

Good Morning!

I figured that since I've been on a Halloween kick lately- today I would share something different!
I chose to create a card that features one of my favorite sets from the upcoming 2012 Holiday Catalog.  The stamp set is called Owl Occasions.  I like this set because it really is for all occasions.  Birthday, Christmas, etc...  Plus- the owl is absolutely adorable!


It was a quick card but I think it came out cute!
Card Ingredients:
Cardstock:  Real Red, Lucky Limemade, Very Vanilla
DSP:  Candlelight Christmas
Stamp Set: Owl Occasions
Inks: Early Espresso, Real Red, Lucky Limeade
Tools:  Big Shot, Apothecary Accents Framelits, Labels Collection Framelits, Stamp-a-ma-jig, SNAIL, 2-way Glue Pen, Stampin' Dimensionals
Embellishments:  Rhinestone Basics Jewels, Dazzling Diamonds, 1/8" Real Red Taffeta Ribbon

Tuesday, July 17, 2012

Two-fer Tuesday part 2


Since I have a love for Halloween AND  parties, I wanted to try and create a little party favor.  Each year I try to find a cute little treat for my favorite little people.  This year- (yes I know....it's only July and Halloween isn't until October) I will be making a bunch of these:


 Mini Milk Cartons!!!  Aren't they adorable?  Yes, they even open like a regular milk carton but these are kid-sized!  What a cute way to package some treats.  They are the perfect size for candy corn,  M&M's, or any other small size candy .

My favorite part about these is the fact that I can make multiple in a very small amount of time.  They are made with the Big Shot, Mini Milk Carton Bigz L die,  Sticky Strip, and your favorite card stock, DSP and embellishments. 

Two-fer Tuesday!

Today is two-fer Tuesday!
What exactly does that mean?   It means that today I will update my blog and give you new ideas not once, but TWICE!  It's extremely HOT in Michigan today (it's currently 97 degrees and the temperature is still rising!) so I figured I'd spend the day indoors making some cards, ornaments, and other fun projects to share with you.
Here is the first of my ideas for the day:


Both cards were made with the following products from the 2012-2013 Stampin' Up! Annual Catalog:
Cardstock:  Baja Breeze, Island Indigo, Whisper White, Pink Pirouette
Inks:  Baja Breeze, Island Indigo, Basic Black, Riding Hood Red
DSP:  Twitterpated
Stamp Set:  From My Heart
Embellishments: Rhinestone Basic Jewels, Baja Breeze 1/2" Seam Binding Ribbon, Pink Pirouette 3/8" Taffeta Ribbon, Basic Black 3/8" Taffeta Ribbon
Tools:  Big Shot, Labels Collection Framelits, SNAIL, Stampin' Dimensionals, Essentials Paper-Piercing Pack, Paper- Piercing Tool, Apothecary Accents Framelits, Adorning Accents Edgelits

Monday, July 16, 2012

Happy Monday!

Good Evening!  Tonight I have a Halloween project that I'd like to share.  I made it using items from the new 2012 Holiday Catalog.  I just love the Googly Ghouls set!  This set is great because you can add little Googlie eyes to them.

Here are the cards individually:


This is a close up of the cute little box that I made to hold the cards:

Card/Box Ingredients:
Cardstock: Tangerine Tango, Basic Gray, Basic Black, Very Vanilla
DSP:  Howlstooth & Scaringbone*
Inks:  Tangerine Tango, Basic Gray, Basic Black
Stamp Set:  Googly Ghouls*
Embellishments:  Googlies*, 1/8" Taffeta Ribbon, 1/2" Scalloped Dots Ribbon, Very Vanilla Seam Binding Ribbon, Brights Brads, Neutrals Brads

* Denotes items from the 2012 Holiday Catalog.  These items will be available to order on August 1st.


Friday, July 13, 2012

Halloween Ornament Tutorial

Yesterday, I promised to post a tutorial on how to create the Halloween Ornament shown below.  This tutorial can also be used to create the Holiday Ornament or any other type of ornament that you would like to make.  Just alter a few of the ingredients and your ornament will have a new look!


Before you begin, you will want to gather a few supplies for your project.
You will need:
Cardstock:  Whisper White
Designer Series Paper (DSP): Howlstooth & Scaringbone*
Ink: Basic Black, Tangerine Tango
Stamp Set: Ornament Keepsakes*
Tools:  Big Shot, Paper Snips, Stampin' Dimensionals, Sticky Strip, Glue Dots, Stampin' Glitter (Dazzling Diamonds), 2-way Glue Pen, Holiday Ornaments Framelits Dies*, Designer Rosette Bigz XL Die, Simply Scored Scoring Tool, Bone Folder, SNAIL Adhesive, 1 1/4" Circle Punch, hot glue gun/extra glue sticks**
Embellishments:  1/2" Striped Satin Ribbon*, Vintage Faceted Designer Buttons, Large Pearl Basics Jewels, Lucky Limeade Bakers Twine

* Denotes an item from the 2012 Holiday Catalog.  These items will be available to order on August 1st.
**Denotes a non-Stampin' Up! item

Directions:
  • Stamp 20 of the large ornament in Basic Black ink onto Whisper White Cardstock.   Stamp 20 of the smaller ornament in Tangerine Tango onto Whisper White Cardstock.
  • Using the Big Shot and the Holiday Ornaments Framelits Dies- cut out all 40 ornaments.
  • Score 15 of the large Basic Black ornaments in half lengthwise using the Simply Scored Scoring Tool.  Score all 20 of the small Tangerine Tango Ornaments in half lengthwise using the Simply Scored Scoring Tool.  Use the Bone Folder to make the folds crisp.
  • Adhere 3 large Basic Black ornaments together using SNAIL Adhesive.  This will create the 3D look.  Continue adhering the large Basic Black ornaments together until you have made 5 individual 3D ornaments.  Your ornaments should look like the ornament pictured below:


  • Take the remaining 5 stamped large Basic Black ornaments and turn them stamped side down.  Using SNAIL, adhere the 3D large Basic Black ornaments to the unstamped side of the ornament.  See picture above.  
  • Adhere all 20 of the smaller Tangerine Tango ornaments together using groups of 4 to create 5 smaller ornaments.  I found that adhering 2 ornaments at a time then adhering 2 groups of 2 together worked best.  Your ornaments should look like the ornament pictured below:

  • Take all 5 large Basic Black ornaments and the 5 smaller Tangerine Tango ornaments and outline the edges of all sides with the 2-way Glue Pen.  Do this one ornament at a time.  After all edges on the ornament have been outlined in glue- sprinkle the edges with Dazzling Diamonds.  Set all ornaments aside and let dry.
  • Cut a 3 1/2" circle out of Whisper White Cardstock and mark the center of the circle with a dot.  The circle adds extra support to the ornament and the dot helps you center the large Basic Black ornaments on the circle.
  • Cut five- 10" long pieces of Lucky Limeade Bakers Twine and set aside.
  • Cut fifteen- 4" long pieces of 1/2" Striped Satin Ribbon.  Apply a Glue Dot on the inside of the ribbon at the very bottom to secure the loop.  Make loops out of all 15 pieces of 1/2" Striped Satin Ribbon.  Set ribbon loops aside.
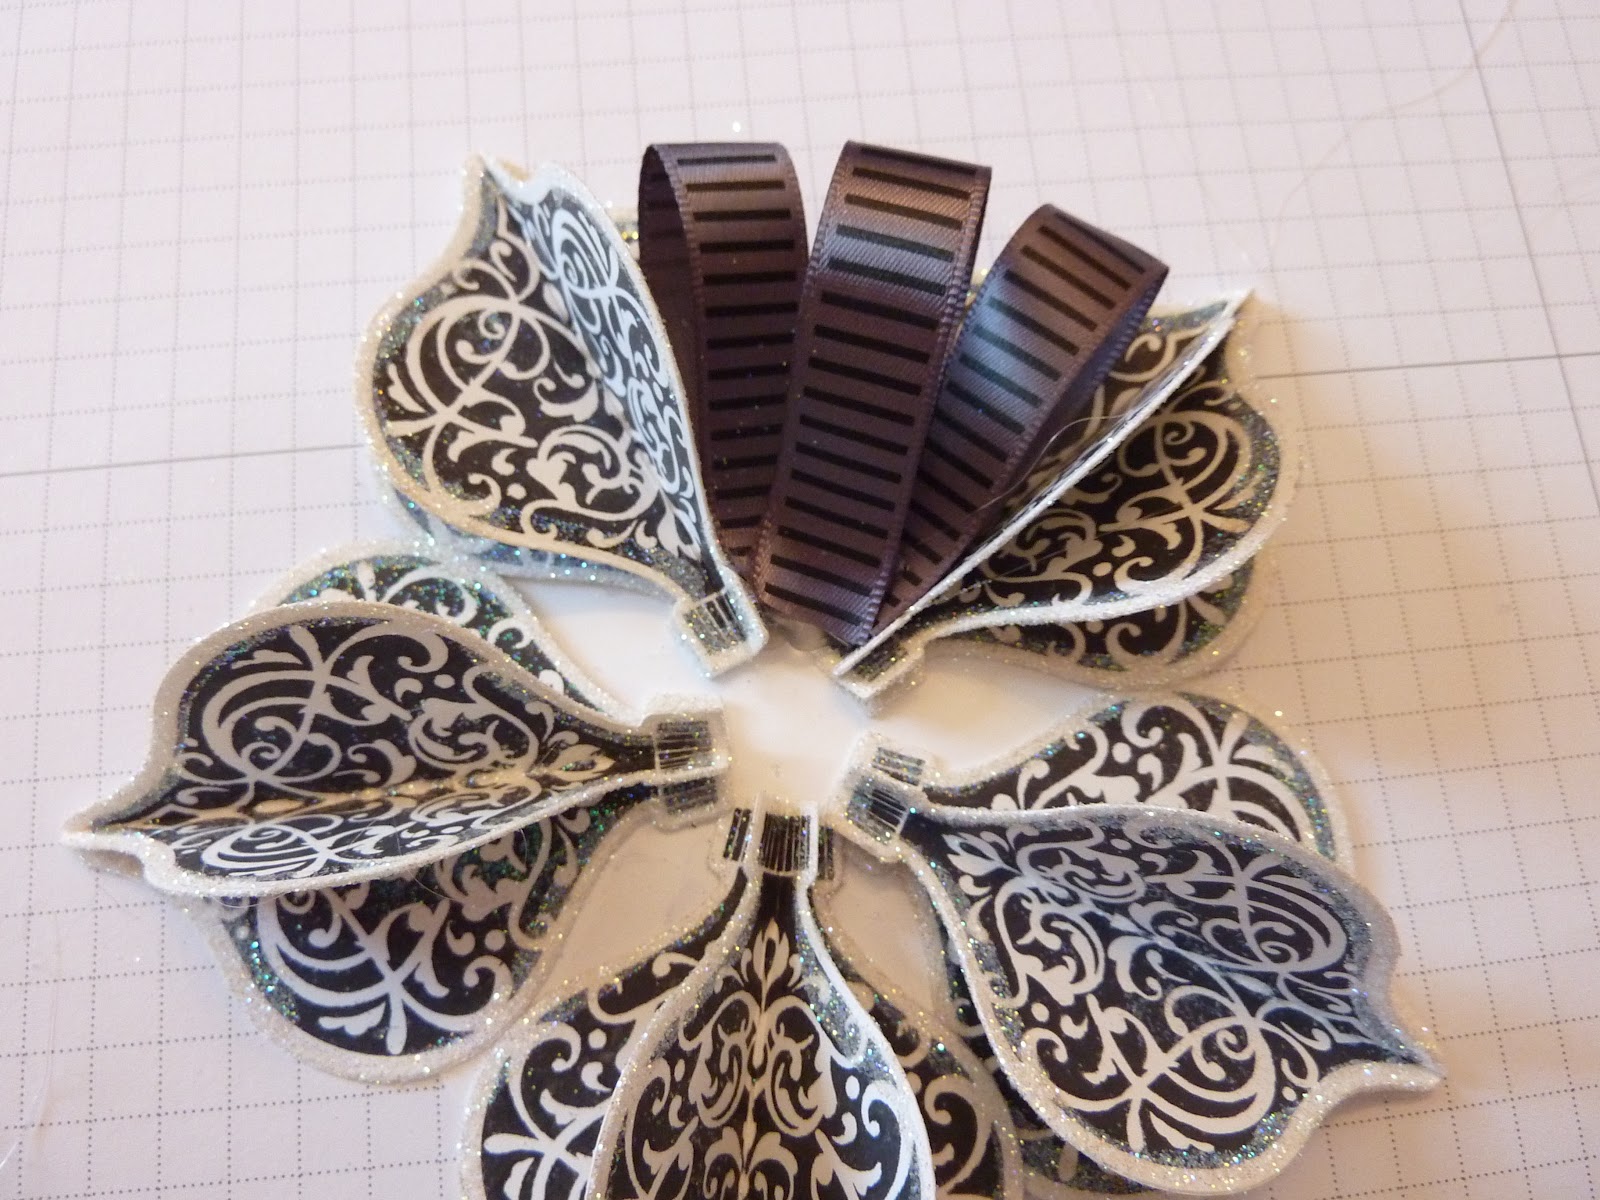
  • Take the 5 large Basic Black ornaments and arrange them  on the 3 1/2" circle.  Use the dot in the center of the 3 1/2" circle to center the ornaments.  Arrange as shown in picture below:

  • Adhere each large Basic Black ornament down one at a time using Sticky Strip- be sure to maintain the layout of the ornaments as shown in the picture above.  
  • Using the hot glue gun, glue down the 1/2" Satin Striped Ribbon loops one at a time.  Glue ribbon loops in between the actual ornaments that you adhered to the 3 1/2" circle. Refer to pictures below:


  • Using the five- 10" pieces of Lucky Limeade Bakers Twine, make a large loop from each piece, then fold the loop in half again making 2 smaller loops.  Use the hot glue gun to attach the Bakers Twine loops to the inside of the ornaments.  See picture below:


  • Cut another 10" long piece of Lucky Limeade Bakers Twine.  Make one loop and tie a knot at the bottom to secure the loop.  This loop will be the hanger for the ornament.  Adhere this loop using the hot glue gun onto the top large Basic Black ornament.  Glue the knot of the loop as far down in the ornament as you can get it.  Note:  You may have to move the 2 loops that you glued in the last step to get a good location to glue this loop.  
  • Next, using the hot glue gun, attach each small Tangerine Tango ornament to the bottom of the center piece of 1/2" Satin Striped Ribbon loop as shown in the picture below:


  • Cut a 1" x 12" strip of Howlstooth & Scaringbone DSP.  You can use whatever pattern you choose.  I chose the pattern that was diagonal stripes on one side and Tangerine Tango with polka dots on the other side.  
  • Using the Big Shot and the Designer Rosette Bigz XL Die, cut out a rosette. Use the 1 1/4" Circle Punch to punch a circle out of Whisper White Cardstock.   After the rosette is cut out- assemble the rosette and attach it the 1 1/4" Whisper White circle with Sticky Strip.  
  • Take one of the large Vintage Faceted Designer Buttons and adhere it to the center of the rosette with hot glue.
  • Take a Large Pearl Basics Jewel and attach it to a Stampin' Dimensional.  Trim excess Stampin' Dimensional from the Pearl with Paper Snips.  Attach the Pearl to the inside of the Vintage Faceted Designer Button.
  • Using the hot glue gun, make a pool of hot glue in the center of the ornament.  It's OK to get glue on the tips of the small Tangerine Tango ornaments as this well help adhere the rosette to the ornament.  
  • Push the rosette into the hot glue puddle and hold for a few seconds to ensure proper bonding.  


Now you have your completed Halloween Ornament!  Isn't it beautiful?

Thursday, July 12, 2012

Halloween Ornament

I have another ornament to show you today.  It's a different take on the Holiday Ornament that I posted yesterday.  Since I'm a HUGE fan of Halloween- I thought it was only appropriate that I create an ornament for Halloween too!


Yes, I will be posting instructions on how to create one of these.  So keep checking back!
Halloween Ornament Ingredients:
Cardstock:  Whisper White
DSP:  Howlstooth & Scaringbone*
Ink:  Basic Black, Tangerine Tango
Stamp Set:  Ornament Keepsakes*
Tools:  Holiday Ornaments Framelits Dies, Big Shot*
Embellishments:  1/2" Striped Satin Ribbon*, Large Pearl Basic Jewels, Vintage Faceted Designer Buttons, Lucky Limeade Baker's Twine
Items marked with an * are items that are from the 2012 Holiday Catalog.  These items will be available for order on August 1.  If you don't have a catalog- contact me TODAY!

Wednesday, July 11, 2012

Holiday Ornament

Today I'd like to share an ornament that I made from my Stampin' Up! Holiday Catalog preorder.  I just got my supplies in this morning and I figured why not give it a try!  I must admit that it looks a lot tougher to make than it actually is.

When completed- the ornament is actually kinda thick.  It sure does have dimension and depth!  Here is a picture that shows the side view:

Keep checking my blog- I plan to hold a workshop where we will create this beautiful ornament.  It's the perfect gift for this upcoming holiday season!  

Holiday Ornament Ingredients:
Cardstock: Whisper White
DSP:  Candlelight Christmas Specialty Paper
Ink: Lucky Limeade, Real Red
Tools:  Big Shot, Holiday Ornaments Framelits, Sticky Strip, Stampin' Dimensionals
Embellishments, Large Pearl Basic Jewels, Vintage Faceted Designer Buttons, 3 1/2" Scalloped Tulle Ribbon (Cherry Cobbler), Linen Thread

Monday, July 9, 2012

Postage Due

Good Afternoon!
I have a card that I would like to share.  It features the Postage Due stamp set from the Stampin' Up! Annual Catalog.  Postage Due is one of my favorite sets because it is so versatile.  It can be used for a variety of occasions ranging from birthday's to thank you's and many many more.  This card was created by using the Triple Time Stamping Technique featured by Dawn Olchefske.

Card Ingredients:
Cardstock:  Very Vanilla, Island Indigo
Inks: Island Indigo, Riding Hood Red, More Mustard, Pink Pirouette, Crumb Cake
Stamp Sets: Postage Due
Embellishments: Regals buttons, Island Indigo Bakers Twine
Adhesive: SNAIL