Monday, July 30, 2018

Monday Montage #121


Hello there stampers!  Welcome back to another edition of Monday Montage.

The project I'm sharing tonight is not new.  They have actually been around for a few years or so.  The candy on the other hand- can't actually be purchased in the USA unless of course you order it through Amazon (which comes with a hefty price).

Mini Tic Tacs are the absolute cutest and when I first saw them on Pinterest I was super bummed that I couldn't find the them anywhere.  A few weeks ago my husband and I had taken a trip to Toronto for the weekend and on the way home we decided to stop at Duty Free. As I was browsing around the store,  I was so excited to see that they had the Mini Tic Tac's!  I couldn't resist buying them!   Now I'm thinking I need to plan my next trip to Canada just so I can stop at the Duty Free shop and buy some more!  I mean they are less than $10 US for a box of 60.  That's a bargain!


Here's a close up of one.  I actually made close to 25 of them today.  I'm going to a meet & greet on Tuesday in Grand Rapids, MI and I thought I'd take these as a small treat for the other Stampin' UP! Demo's who will be meeting me for dinner.


Yes! They are really tiny.  They barely measure 1-3/8" tall.   So cute!


Here's a whole lot of them!  I'm hoping my fellow demo's will love them!  As I said before- these have been around a while.  I'm not sure who the original creator of them is however I used a tutorial from Omellie's Designs.  (You can see her tutorial here).  Since her tutorial was in cm I had to convert it to inches.  It wasn't hard to do- just had to work out the measurements!

Thanks for stopping by!  Be sure to use the links below to navigate through the hop!  Click the BACK button to visit the fabulous Cathy Casey or click the NEXT button and head on over to the amazing Elizabeth Price to see her gorgeous project!


There are 2 AWESOME promotions going on right now!  There is a DSP sale (when you buy 3 you get 1 free!  Applies to specific patterns only) and a smokin' hot promo when you join my team!  See below for details!


New recruits get their choice of an Ink Pad color family in addition to being able to select your choice of $125 in products for your starter kit!  Contact me for more details!  Ready to join?  Simply click the JOIN MY TEAM button on the right side bar!  I've had a lot of questions in regards to joining my team.  There are no obligations.  Try it out- if you don't like it then the worst that happens is that you have $125 in product as well as an entire color family of ink pads to add to your collection.  I promise  it's that simple!


Monday Montage Hoppers
Breelin Renwick - Craft-somnia Momma
Cathy Casey-https://sugarshackdesigns.com

Saturday, July 28, 2018

Last chance!

Hello stampers!  Your time is almost up to join my team and receive an entire color family of ink pads.  This amazing promotion will expire on 7/31/18.  You don't want to miss out!  There are many benefits to being a Stampin' UP! demonstrator.  You get to see and order new products before everyone else, you get a discount on everything, you get to go to exclusive Stampin' UP! events and much more!  Come join me!  You won't regret it!


Click the JOIN MY TEAM link on the right sidebar!


Thursday, July 26, 2018

Fancy Friday Blog Hop

Hello there and welcome back for another Fancy Friday blog hop.  I'm hopping with my fancy friends today- all are either current or former members of the Stampin' UP! Artisan Design Team.  Today we are featuring stamp sets with a tropical vibe.

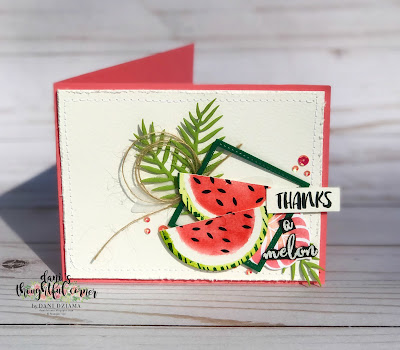
For my card I chose the Tropical Chic Stamp Set.  Every time I pull this gorgeous stamp set out the first image I'm drawn to is a bunch of seeds.  Why?  I'm not really sure but it's always the first stamp I see.  For that reason- I chose to feature that particular stamp!  

Now in case you're wondering, No- I don't just see a bunch of seeds when looking at that stamp.  I also see a watermelon....and a watermelon rind from the striped stamp.  Stretching the imagination?  Maybe but it works!  See?


I told you!  Flirty Flamingo makes the most delicious looking watermelon!  The rind looks pretty awesome too!  The striped stamp was inked with Shaded Spruce and stamped onto the rind to add texture.  


A fun card for sure!  


The "Thanks" sentiment is from the Fabulous Flamingo Stamp Set and "a melon" was stamped using the Make A Difference Stamp Set onto Basic Black Card Stock and heat embossed using VersaMark and the White Stampin' Emboss Powder.  Overall this is a fairly simple card to create!

Thanks for stopping by!   Up next is the amazing Connie Collins!  Please be sure to click the next button and hop along with us!

Supplies used:
Card Stock:  Flirty Flamingo, Shaded Spruce, Granny Apple Green, Watercolor Paper, Vellum
Stamps:  Tropical Chic, Fabulous Flamingo, Make A Difference
Inks:  Flirty Flamingo, Shaded Spruce, Lemon Lime Twist, Granny Apple Green, Grapefruit Grove, Tuxedo Black
Tools/other supplies:  Big Shot, Tropical Thinlits Dies, Stitched Shapes Framelits Dies, Layering Squares Framelits Dies, Bunch of Banners, Iridescent Sequin Assortment, Burlap Ribbon, Heat Tool, White Stampin' Emboss Powder


*******EDITED TO ADD THE TUTORIAL FOR THE WATERMELON.  CLICK HERE TO DOWNLOAD TUTORIAL******
Tuesday, July 24, 2018

Get Well Soon

Good evening stampers!  I have a quick card to share with you tonight.  It was created using the Healing Hugs Stamp Set.  I fell in love with this gorgeous rose when I was browsing the catalog and could not wait to get the stamp set for myself!  


The roses were stamped in Lovely Lipstick ink onto a 4" x 5-1/4" Whisper White layer.  Pear Pizzazz leaves were added in between the roses.  The background was colored using the Light Pool Party Stampin' Blend and the Color Lifter.  
Such an easy card to create and oh so pretty!
Thanks for stopping by!

Sunday, July 22, 2018

Dream Big

Good evening stampers!  Tonight as I was sitting at my desk- I really wasn't sure what I wanted to create.  After all I had already spent pretty much my entire day creating gorgeous projects from shoebox swaps that my Stampin' UP! friends from Columbus brought.  As I was looking through my stamps and framelits I finally settled upon the Follow Your Dreams Stamp Set and coordinating Chase Your Dreams Framelits Dies.  

Since I didn't really have anything in particular that I wanted to create- I just went with the first idea that popped into my head.  That idea consisted of a Balmy Blue watercolor wash and some Vellum feathers.  Five to be exact.


As I'm sure you already know- it's difficult to adhere Vellum without the adhesive showing.  For that reason I chose to sew the feathers onto my card.  After the feathers had all been sewn I then created the sentiment.  Dream Big.  


I first cut out 5 (I seem to like that number tonight!) dream sentiments from a piece of Night Of Navy Card Stock.  Using Multipurpose Liquid Glue I adhered them all together.  After the stacked sentiment was completely dry I then applied a somewhat thick layer of glue from the Fine Tip Glue Pen to make the sentiment shiny.  Next- I stamped the word BIG onto a scrap of Balmy Blue Card Stock.  


Before I adhered the sentiment onto the card I carefully ruffled each feather so that it would look somewhat 3dimensional.  A tiny pool of Silver Metallic Thread  was laid in the center of the card and dream was attached using Glue Dots.  BIG was adhered using a Foam Strip.  

I hope you have enjoyed my project for tonight!  Thanks for stopping by!


Wednesday, July 18, 2018

Follow Your Dreams

Hello there stampers!  Do you ever CASE your own cards?  That's exactly what I did tonight!  I loved the color combination and design of the card I created last night so much that I wanted to use it again only with a completely different stamp set and dies.

The Follow Your Dreams Stamp Set and coordinating Chase Your Dreams Framelits were the perfect match for my card tonight.  To create this card- I began by making a watercolor wash using the Prussian Blue Brusho Crystal Colour.  After my desired shade was achieved I set it aside to dry.  After the card was dry I added the stitching along the edges and then distressed them with my Paper Snips.


I then cut out 2 of the larger dream catchers from Petal Pink and Pool Party Card Stock and one of the  smaller dream catchers from Soft Sea Foam Card Stock.  Since the smaller dream catcher has feathers attached as part of the die- I simply trimmed those pieces off so I was left with just a circle.


The beautiful Share What You Love Artisan Pearls look absolutely amazing with this color scheme.  
In the close up above- you can somewhat see the variations in the Brusho- some places are much darker than others.  I particularly love this effect as the color variation really makes the other embellishments pop.

Thanks for stopping by!

Tuesday, July 17, 2018

Best Wishes

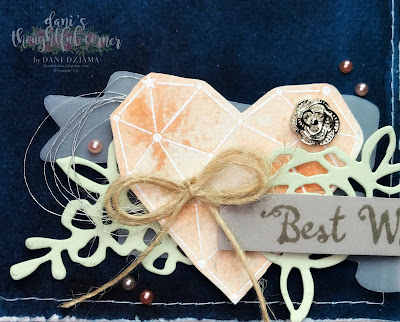
Hello there stampers!  I am back for the third day in a row with another gorgeous card!  Can you believe it?  This card was created for a friend's upcoming wedding and I adore it!  It's so pretty!  Did you notice that it was created with a stamp set that was designed for a baby?


The Little Twinkle Stamp Set is on page 83 of the Stampin' UP! Annual Catalog and it was one of the very first sets that caught my eye in the catalog.  Normally I don't buy sets that are kids/baby themed as I don't really need them but this year I made an exception.  I'm so happy that I did!  The stamp set is beautiful.  My favorite image is the heart constellation.  It's just gorgeous.  

I also love the Twinkle Twinkle Designer Series Paper and wanted to use the piece that looks like the night time sky.  After much debate I decided I would use Brusho instead.  Now- I've never really used Brusho until tonight so I'm still learning.  I'm also gonna confess that I've only used one color and that is the Prussian Blue.  I can't believe how gorgeous it is!  The color is so vibrant and beautiful.  It makes the perfect background for this card!


To give my layer a little bit of extra interest- I sewed around the edges and then distressed them with the Paper Snips.  

I hope you have enjoyed my project!  Thanks for stopping by!

Monday, July 16, 2018

Love You To Pieces

Hello there stampers!  Do you ever browse catalogs or other publications for inspiration?  When I first received the Stampin' UP! Annual Catalog- one stamp set in particular stood out to me.  That set was the Love You to Pieces set.  I absolutely adored the card pictured in the catalog and knew that this was definitely one of my must have sets.  

My project tonight was created with the Love You To Pieces stamp set and coordinating Puzzle Piece Thinlits.  To create this card- I first began with a piece of Watercolor Paper that measures 3-/4" x 5".   I then applied a light watercolor wash to the lower right hand side of the card using Lovely Lipstick.
  

I then stamped 2 puzzle pieces- one in Lovely Lipstick and the other in Coastal Cabana.  In case you haven't noticed- Coastal Cabana and Lovely Lipstick are gorgeous together!  Don't believe me?  Try it for yourself!

It's a little difficult to see in the picture- but under the Coastal Cabana puzzle piece is a tiny nest of Silver Metallic Thread.  The Metallics Sequin Assortment has the perfect sequins to embellish this card!  

After the watercolor layer was complete- I cut a piece of Lovely Lipstick Card Stock to 3-7/8" x 5-3/8" and a Coastal Cabana Card Stock base (that measures 5-1/2" x 8-1/2" scored at 4-1/4").  The Lovely Lipstick layer and the watercolor layer were offset and adhered to the card.

Super easy and oh so cute!  Hopefully my hubby will love his card.  He's been in London for the past week taking in the sights and watching Wimbledon.  ❤

Thanks for stopping by!


Monday Montage #120 Beach Please!


Hello there stampers!  Welcome back to another edition of Monday Montage.

For my project tonight I created a card that is super fun!  It's a beach scene complete with a starfish, some fish swimming and a pair of flip flops!
This card is actually based on a sketch for the Global Design Project 146- Sketch Challenge.

Here is the sketch that was provided for the challenge.

I kept the same basic sketch layout with a few minor changes.  My sentiment is in the opposite corner than the one pictured in the sketch.   Due to the sentiment being moved, I also needed to move the location of the image that was located where I put my sentiment.  For my card- this is the perfect layout as it allows for the flip flops to be in the proper place (on the sand and not in the water).


This card is super cute!  I began by creating a watercolor wash using Balmy Blue for the water and Crumb Cake for the sand.  I left about an 1/8" gap between the two watercolor washes so that I could add in some sea foam using the Shimmery White Embossing Paste.  


See those adorable flip flops?  After sketching a template onto Vellum- I carefully cut the outer portion, the inner portion and the strap out creating a template.  I then traced the template onto Poppy Parade Card Stock and cut the outer pieces out.  For the inner pieces- I used the Tropical Chic Stamp Set (specifically the stamp with lots of lines on it) and inked it with Poppy Parade ink and stamped it onto a piece of Whisper White Card Stock.  I then traced the inner portion onto the stamped image and cut it out.  The straps were cut out from Poppy Parade Card Stock.  As all fashionable flip flops have some sort of embellishment on them I thought it was fitting to add little stars from the Twinkle Adhesive Backed Sequins.


Thanks for stopping by!  Be sure to use the links below to navigate through the hop!  Click the BACK button to visit the fabulous Breelin Renwick or click the NEXT button and head on over to the amazing Elizabeth Price to see what she has created to share with you!


There are 2 AWESOME promotions going on right now!  There is a DSP sale (when you buy 3 you get 1 free!  Applies to specific patterns only) and a smokin' hot promo when you join my team!  See below for details!


New recruits get their choice of an Ink Pad color family in addition to being able to select your choice of $125 in products for your starter kit!  Contact me for more details!  Ready to join?  Simply click the JOIN MY TEAM button on the right side bar!


Monday Montage Hoppers

Thursday, July 12, 2018

OSAT Blog Hop- Creature Comforts

Hey there stampers! Welcome back for another fabulous One Stamp At A Time Blog Hop!  This month we have a fun theme!  It's called Creature Comforts and we are featuring animals!  How fun!  

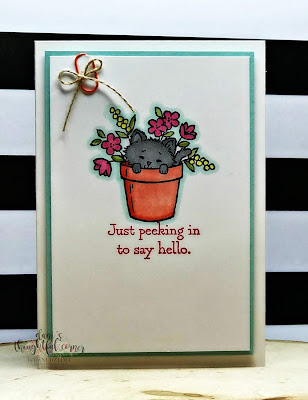
 I figured there would be a lot of people using the Animal Outing stamp set so I thought it best to choose a different set.  I went with an oldie but a goodie- Pretty Kitty!  The adorable little kitten reminds me of my Stella.  She is the sweetest little girl ❤


I created a set of 5 cards.  Each kitty was created exactly the same.  First I stamped the images onto a 3" x 4-1/2" layer.  I then colored them in using various Stampin' Blends colors (Smoky Slate, Pineapple Punch, Lovely Lipstick, Rich Razzleberry, Calypso Coral, Old Olive, Pool Party).  


I wanted to keep each kitty as similar as possibly as she represents my Stella.


Stella is a little lover.  She absolutely loves to be pet and she melts immediately upon contact.  She is so stinkin' cute! 


This little kitty reminds me of Salem.  She is Stella's sister and an absolute little stinker.  She is always rummaging through my desk drawers for things to steal!  Usually it's my Baker's Twine.  Sadly she knows how to open my drawers so nothing is safe.


I love how the Calypso Coral Blends (both light and dark) when used together look very similar to terra cotta.  


This set of cards is not fancy at all.  They are  perfect class cards and make and takes, etc.  

For my 3 dimensional project- I used a 2" x 2" square Clear Treat Box.  I shredded up some Pool Party Card Stock and placed it in the box.  I then added the cutest little Lindt Candy Bars.  I have never seen them so tiny before!  I bought them at Duty Free on my way home from Toronto this past weekend.  The chocolates measure just 1" x 1-1/4".  Tiny!


Here's a closeup of the bow.  It was created using the Pool Party Shimmer Ribbon.  It's so pretty in person!

I hope you have enjoyed my projects for today!  Be sure to follow along on the hop! 
Use the links below to follow around on the hop with us!  We have LOTS of gorgeous creations to share!

Thanks for stopping by!


Monday, July 2, 2018

Monday Montage #119: Piece of Cake!


Hello there stampers!  Welcome back to another edition of Monday Montage.

On Friday- I shared a a few projects that featured a fun color combination using a few of the new colors in the Stampin' UP! Catalog.  Tonight I have another card to share with the same color combo!  It is SUPER cute and calorie free!


First of all- let's talk cake.  Who doesn't like cake?  It's essential to every birthday.  Birthday's and cake go hand in hand!  My card tonight is no exception!  It's a birthday card so therefore it must have cake!


I cannot take credit for this original design.  I was browsing Pinterest and came across a card that was created by Lisa Adessa and I knew I had to create one of my own!  My card has the same basic idea as hers only just a little different!


To create this fun card- I began by cutting six pieces of card stock that measure 1/2" x 2-3/4".  One piece per color:  Lovely Lipstick, Mango Melody, Pineapple Punch, Call Me Clover, Blueberry Bushel and Gorgeous Grape.  I then adhered each 1/2" x 2-3/4" piece to a Multipurpose Adhesive Sheet.  One by one I removed them from the adhesive sheet and sprinkled them with Dazzling Diamonds.  After all pieces were coated with the Dazzling Diamonds- I used Multipurpose Liquid Glue to adhere them to a piece of Whisper White card stock that measures 3" x 4-1/4".  When adhering the cake layers down- I left a 1/4" border on the left side of the Whisper White layer so I could add frosting later. I also left approximately 1/8" between each color to give the appearance of icing between the cake layers.


Next it was time to frost the cake!  To do this- I used the Shimmery White Embossing Paste.  I first applied a thin layer to the 1/4" border on the left side of the cake layers.  You don't need to mask the cake layers off as long as you're careful in applying the Embossing Paste.  Swirl it around and it looks just like frosting!  For the icing on top of the cake- I free handed a wedge to give the appearance of a cake slice and trimmed the excess card stock from the top.  Once again- I added the Shimmery White Embossing Paste carefully so to not cover up the top cake layer.

A few things to note- it's difficult to see the glitter in the Shimmery White Embossing Paste in the pictures.  I apologize- it just wasn't showing up very well.  You could technically tint the icing to make it any color you want.  I personally just preferred it to be white.  However if you do decide to tint the icing- I would make the 3" x 4-1/4" layer the same color as the color you choose for the icing.  That way- the icing between cake layers will be the same as the Embossing Paste icing.

Thanks for stopping by!  Be sure to use the links below to navigate through the hop!  Click the BACK button to visit the fabulous Cathy Casey or click the NEXT button and head on over to the amazing Elizabeth Price to see what she has created to share with you!  


There are 2 AWESOME promotions going on right now!  There is a DSP sale (when you buy 3 you get 1 free!  Applies to specific patterns only) and a smokin' hot promo when you join my team!  See below for details!


New recruits get their choice of an Ink Pad color family in addition to being able to select your choice of $125 in products for your starter kit!  Contact me for more details!  Ready to join?  Simply click the JOIN MY TEAM button on the right side bar!


Monday Montage Hoppers