Sunday, October 1, 2023

Tricky Treats!


Hello there!  Our theme for this month's Creation Station Design Team Hop is Tricky Treats.  For this challenge- we are sharing tips and tricks for creating treats holders.  I chose to use the Tricks & Treats Bundle for this challenge as I simply adore the lil treat bag die.


In order to create a much shorter treat bag- I used the zigzag edge die to cut off the excess DSP.  
I then used the second to largest circle die from the Stylish Shapes Dies to create the large Basic Black Circle.  The Basic White layer was cut using the third to largest circle die from the Stylish Shapes Dies. 


Be sure to stamp the sentiment towards the right half of the Basic White layer.  This allows for the house die cut to be attached just to the left of the sentiment.  Next- stamp the bats image several times in Tuxedo Black Memento Ink.  Stamp the bats above, below and to the right/left sides of the sentiment.


Ink the house stamp and die cut using the house die from the Tricks & Treats Dies.
TRICK:  To get a smoother stamped image for the house- I first inked the stamp using Versamark and then inked it again using the Tuxedo Black Memento Ink.  Embellish using two Glow In The Dark Bats.  TIP:  To make the Glow In The Dark Bats glow brighter- set them under a very bright light for a few minutes to "charge".

Thanks for stopping by!  Click the NEXT button to see what Sara has created!


Monday, September 25, 2023

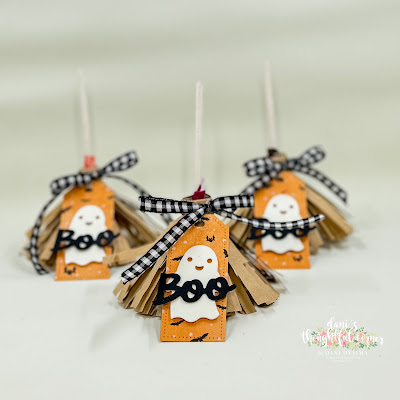
Monday Montage #245: Halloween Broom Tootsie Pops


Hey there stampin' friends!  Welcome back for another fabulous Monday Montage Blog Hop!  Today I have a quick and easy Halloween Treat to share.  These little cuties are perfect for last minute treats as each one only takes a few minutes tops to create.  


To create these- I started by cutting the bottom portion off a brown paper lunch sack.  Then I cut the bag in half vertically.  Next I cut some fringe on the open side of the bag and added some Tear & Tape along the top.  Remove the Tear & Tape liner and carefully wrap around the stick of a Tootsie Pop. Embellish as you like!


The picture above shows the back view of the Tootsie Pop Broom.  As you can see the Tootsie Pop shows through a little bit- but that's ok!  It's still super cute!


Thanks for stopping by!  Please be sure to click the links below to navigate throughout the hop!  BACK will take you to Cheryl Curtis and NEXT to Elizabeth Price.  


Monday, September 11, 2023

Monday Montage #244


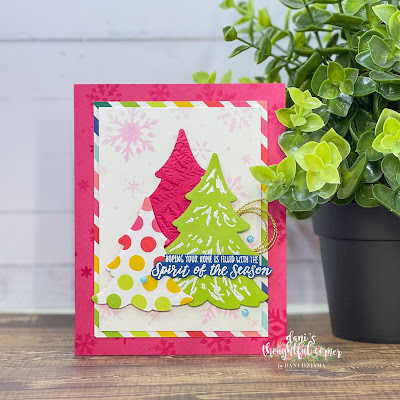
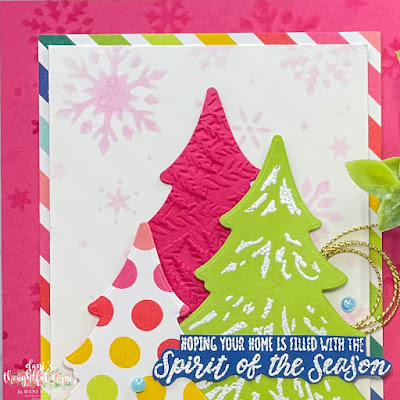
Hey there stampin' friends!  Welcome back for another fabulous Monday Montage Blog Hop!  Today I have created a bright and beautiful Christmas card.  I truly adore the Merry Bold & Bright DSP from the new September-December Mini Catalog.  It's so colorful and FUN!


For this card- I used the Abundant Beauty Decorative Masks to create the snowflake background on both the Basic White layer as well as the Melon Mambo card base.  Then I added a piece of rainbow striped DSP to the card base and layered the Basic White layer onto the rainbow DSP.  


Next, I die cut a series of 3 trees- 1 small tree from the Merry Bold & Bright DSP, 1 medium sized tree out of Granny Apple Green Card Stock and 1 medium sized tree out of Melon Mambo Card Stock.  The Melon Mambo tree was embossed using the Fern 3D Embossing Folder.  The Granny Apple Green tree was heat embossed using White Stampin' Emboss Powder (Basics Embossing Powders).


The sentiment was stamped in Versamark Ink onto Blueberry Bushel Card Stock and heat embossed with White Stampin' Emboss powder.  To finish the card off- a small swirl of Gold Simply Elegant Trim was added underneath the right side of the Granny Apple Green tree.  Three 2022-2024 In Color Pearls were added for interest.

  
 Thanks for stopping by!  Please be sure to click the links below to navigate throughout the hop!  BACK will take you to Cheryl Curtis and NEXT to Elizabeth Price.  


Sunday, September 3, 2023

Creation Station: Monochromatic


Hello there!  This month the designers for Creation Station are creating monochromatic projects.  I love the look of monochromatic cards.  They are so pretty!


For my card- I started by embossing a piece of Pretty Peacock Card Stock using the Painted Posies 3D Embossing Folder.  Then I carefully dragged the Whisper White Craft Pad across the embossed images to highlight them.  Next- I added a bunch of Whisper White Craft Ink splatters to the embossed image using a Water Painter and the White Craft Ink Refill. The edges of the embossed layer were distressed using a pair of Paper Snips.


Using a Blending Brush, Pretty Peacock Classic Ink and a piece of Pretty Peacock Card Stock- I added a bit of ink to the card stock to make the color deeper.  This served as the background for the Sending sentiment as well as the tiny flowers.  

The sentiment was the die cut using the Sending Dies and coordinating Sending Smiles Photopolymer Stamp Set and attached to the card using staples.  Birthday Wishes was stamped in Pretty Peacock Classic Ink and stamped onto a Basic White scrap (which was then die cut using the Sending Dies).  


For the bow- I cut a small piece of Lost Lagoon 1/4" Bordered Ribbon in half and adhered it to the top left corner of the card using a glue dot.  A tiny Linen Thread bow was added to the top of the Lost Lagoon Ribbon for added interest.  
The card was embellished using Loose Silver Sequins.

Thanks for stopping by!  I hope you've enjoyed my monochromatic card! Click the NEXT button to see what Rachel has created!


Friday, August 11, 2023

TGIFC#433: Sketch Challenge!


When I saw there was a sketch challenge at TGIF this week I could't resist playing along!  Sketch Challenges are so fun mostly because they take the guesswork out of creating.  The fun part is adding in the stamps/dsp/embellishments. 

For my card- I flipped the sketch around. I used a piece of Them Bones DSP from the upcoming September-December Mini Catalog for the main focal image and added 3 adorable little ghosts cut from the Tricks & Treats Dies (September-December Mini Catalog).  I cut a piece of White Iridescent Ribbon (from the upcoming September-December Mini Catalog) in half and colored it in using the Light Starry Sky Stampin' Blend.  The BOO sentiment is also from the Tricks & Treats Dies and was adhered in the middle of the 3 ghosts.


Why not join in on the fun and create a card of your own?  Simply create a card using the above sketch and submit it on the TGIF Challenges blog using the guidelines below!

Deadline for challenges is Thursday 8/17/2023 at 10am PST.


  • Uploaded projects need to be direct linked to your blog, Facebook, or other on line gallery.
  • Please post the TGIF Challenge graphic on your blog and link back to our site
  • Your project MUST be new and inspired by our challenge parameters
  • When sharing your project publicly, please use this weeks hashtag- #TGIFC433
  • Winning project(s) will be posted on next week's challenge on Friday 8/18/2023
  • Questions should be left in the comment section
  • Challengers can even post your cards on our FB page too!!  "Like us" while you're there :-)

Sunday, August 6, 2023

Creation Station: Ombre Blending


Hello there!  This month the designers for Creation Station are making projects that feature Ombre Blending.  With an idea in mind, I just couldn't resist using some new products from the upcoming September-December Mini Catalog!  Fortunately my preorder arrived Thursday so I was good to go!


To create the first card- I began by making a rainbow ombre background using Poppy Parade, Melon Mambo, Crushed Curry, Granny Apple Green, Shaded Spruce and Blueberry Bushel.  It was then embossed using the upcoming Christmas Tidings Embossing Folder and the edges were distressed using Paper Snips.  


I then die cut 2 tags (One in Basic Black and one in Basic White) using the upcoming Merriest Trees Dies.   Another rainbow ombre background was created for the two trees (die cut using the upcoming Merriest Trees Dies).  The fabulous ribbon on the tags is the upcoming White Iridescent Ribbon from the September-December Mini Catalog.  The card was embellished using the upcoming Iridescent Adhesive Backed Discs.  

I know I say this every year but I LOVE non traditional colors for the holidays.  The non traditional colors make me think of vintage mercury glass ornaments.  Those ornaments were always so full of bright, fun colors.  Which brings me to my next card.  This card is definitely bright and fun (and filled with non traditional colors)!


The DSP background is from the upcoming September-December Mini Catalog and is called Merry Bold & Bright DSP.  Again- I created another ombre rainbow background (Poppy Parade, Melon Mambo, Crushed Curry, Granny Apple Green, Shaded Spruce, and Blueberry Bushel).  Using the upcoming Merriest Trees Dies- I've cut out a large tree and a medium sized tree (medium tree was cut from an ombre Melon Mambo background).  These trees rest upon a Basic White scalloped panel cut using the Scalloped Contours Dies.  The sentiment on the tree as well as the snow on the rainbow tree is from the upcoming Merriest Trees Stamp Set and was heat embossed using Versamark Ink and White Stampin' Emboss Powder.  A small ribbon tail was aded to the upper left corner of the Basic White layer using the upcoming White Iridescent Ribbon (cut in half vertically).


Thanks for stopping by!  I hope you've enjoyed the SNEAK PEEK of the upcoming September-December Mini Catalog.  Up next on our hop is the fabulous Jeanna Bohannan.


Monday, July 31, 2023

Monday Montage#241


I am on a fun fold card kick lately!  This is the first in a series of about 15 that I've made using this particular style card. They are fast, super easy to create and oh so cute!  The hardest part is choosing what DSP/stamps to use.

For my card- I've used the Masterfully Made DSP, Gorgeously Made Stamp Set and coordinating Gorgeously Made Dies as well as Fresh Freesia,  Pretty Peacock, Azure Afternoon and Basic White Card Stock.  

This is the front of the card.  From this view it looks pretty much like a regular card however...


Simply open the first panel to reveal the first inside panel.  


Open the second panel and you'll see a third panel!  On this particular card- I didn't leave room to sign the card.  I was debating whether or not I'd adhere the DSP layer to a card base or if I'd leave it as is.  Since I chose to leave it as is- I'll be using a post it note to include my personal message to the recipient.


I'm not really sure what this card is technically called or who created it originally (I found so many versions when I was looking for fun folds).  But I've seen it mostly as a trifold accordion card.  

Want to make one too?  It's SO easy!  Simply begin by cutting a piece of DSP that measures 12" x 5-1/2".  Score at 1-3/4", 4-3/4" and at 7-3/4".  
First score line (1-3/4") is a valley fold.  Second score line (4-3/4") is a mountain fold.  Third score line (7-3/4") is a valley fold.
Adhere the middle fold closed using Stampin' Seal.

To decorate the card- It doesn't really matter what shape you use for your image panels as long as they are all the same size/shape.   It can be circles, squares, rectangles- anything really!

1. Center and adhere the first stamped panel to the 1-3/4" panel. (Only apply adhesive to the left side of the panel)  Open the first panel so the second panel is exposed.  
2. Line up the second panel with the back of the first panel, and adhere using Stampin' Seal.  (Only apply adhesive along the left part of the panel- otherwise it will stick to the 3rd card panel)
3.  Line up the third stamped panel with the back of the second panel.  Apply adhesive to the entire back of the panel and fold the back of the card closed.  
All 3 panels should now be aligned with only the first panel visible.
Tip:  Don't use Stampin' Dimensionals to decorate the inside panels as it makes them too thick causing them not to close properly. 


 Thanks for stopping by!  Please be sure to click the links below to navigate throughout the hop!  BACK will take you to Cheryl Curtis and NEXT to Elizabeth Price.  


Friday, July 28, 2023

TGIFC#431


Good morning!  Welcome back for another TGIF Challenge.  Today we have an Inspiration Challenge!  For this challenge- we could choose whatever we were inspired by from the picture above.  It could be the stripes, dots, sentiment, the cupcake images- whatever!

I chose the bright stripes and the big sentiment and created a fun Birthday card.  What would you chose as your inspiration?


Why not join in on the fun and create a card of your own?  Simply create a card using the above sketch and submit it on the TGIF Challenges blog using the guidelines below!

Deadline for challenges is Thursday 8/03/2023 at 10am PST.


  • Uploaded projects need to be direct linked to your blog, Facebook, or other on line gallery.
  • Please post the TGIF Challenge graphic on your blog and link back to our site
  • Your project MUST be new and inspired by our challenge parameters
  • When sharing your project publicly, please use this weeks hashtag- #TGIFC431
  • Winning project(s) will be posted on next week's challenge on Friday 8/04/2023
  • Questions should be left in the comment section
  • Challengers can even post your cards on our FB page too!!  "Like us" while you're there :-)

Monday, July 17, 2023

Monday Montage #240: Happy Birthday!


Do you keep a stash of cards on hand?  I love having a bunch all ready to go and this card was perfect to add to the stash!  Created using the Alphabet A La Mode Dies, Beautiful Balloons Dies, Basics 3D Embossing Folders and the Zany Zoo Stamp Set- this fun birthday card features a rainbow of watercolored balloons and the traditional Happy Birthday To You sentiment.


The HAPPY sentiment looks 3 dimensional thanks to the fabulous Foam Adhesive Sheets.  To create the Sentiment- I stamped the word birthday first- then line up the to you portion of the sentiment after as the stamp itself reads:
Happy
Birthday
To You
and not all in one line as it is on the card.  

The Balloons were watercolored using the following colors:  Melon Mambo, Flirty Flamingo, Pumpkin Pie, Daffodil Delight, Granny Apple Green, Azure Afternoon, Highland Heather and Fresh Fresia.


The card was finished by adding a tiny white Baker's Twine bow (Baker's Twine Essentials Pack) and 3 pearls from the 2022-2024 In Color Pearls.

Thanks for stopping by!  Please be sure to click the links below to navigate throughout the hop!  BACK will take you to Cheryl Curtis and NEXT to Elizabeth Price.  


Friday, July 14, 2023

TGIFC #429 Sketch Challenge


Good morning!  Welcome back for another TGIF Challenge.  Today we have a super fun sketch!  I love sketch challenges as the difficult part of creating is already done!  Simply choose your card stock/DSP, stamps/embellishments and that's it! 


I chose the Pretty Peacock/white heart pattern DSP from the Delightfully Eclectic DSP as my background.   I then added a notebook paper circle (also from the Delightfully Eclectic DSP) to hold the main focal image.  The circle was cut using the largest circle die from the Reach For The Stars Dies.  I cut three Bubble Bath hearts from the Celebrations Tag Dies (retired) and adhered them together using Stampin Dimensionals to create the illusion of a 3 dimensional heart.  The sentiment is from the Just My Type Stamp Set.  I added a Linen Thread Bow and a few Loose Frosted Dots for interest.


 Thanks for stopping by!  
Why not join in on the fun and create a card of your own?  Simply create a card using the above sketch and submit it on the TGIF Challenges blog using the guidelines below!

Deadline for challenges is Thursday 7/20/2023 at 10am PST.


  • Uploaded projects need to be direct linked to your blog, Facebook, or other on line gallery.
  • Please post the TGIF Challenge graphic on your blog and link back to our site
  • Your project MUST be new and inspired by our challenge parameters
  • When sharing your project publicly, please use this weeks hashtag- #TGIFC429
  • Winning project(s) will be posted on next week's challenge on Friday 7/21/2023
  • Questions should be left in the comment section
  • Challengers can even post your cards on our FB page too!!  "Like us" while you're there :-)

Friday, July 7, 2023

TGIF Challenges: Color Challenge


Good morning!  Welcome back for another TGIF Challenge.  Today we have a fun color challenge!  We are creating cards that use the following colors:  Lemon Lolly, Sweet Sorbet and Basic Black.  I paired those 3 colors with the Sweet Citrus Stamp Set and coordinating Sweet Citrus Hybrid Embossing Folder.  


Very simple card to create- I used the Sweet Citrus Hybrid Embossing Folder to create the background on the Basic White layer.  I then colored the centers of the lemons using a Blending Brush and Lemon Lolly Ink.   The leaf images were stamped in VersaMark ink and then heat embossed using the Basics Embossing Powders (White) and the Heat Tool.  Several flowers were stamped in Sweet Sorbet and cut out to add interest.

 Thanks for stopping by!  
Why not join in on the fun and create a card of your own?  Simply create a card using the above sketch and submit it on the TGIF Challenges blog using the guidelines below!

Deadline for challenges is Thursday 7/13/2023 at 10am PST.


  • Uploaded projects need to be direct linked to your blog, Facebook, or other on line gallery.
  • Please post the TGIF Challenge graphic on your blog and link back to our site
  • Your project MUST be new and inspired by our challenge parameters
  • When sharing your project publicly, please use this weeks hashtag- #TGIFC428
  • Winning project(s) will be posted on next week's challenge on Friday 7/14/2023
  • Questions should be left in the comment section
  • Challengers can even post your cards on our FB page too!!  "Like us" while you're there :-)

Monday, July 3, 2023

Monday Montage #239


Hello stampin' friends!  It's been cloudy and overcast here in Ohio for the past few weeks (lots of smoke from the Canadian wildfires has settled here in the Ohio River Valley).  It feels like we haven't seen the sun in forever.  Thanks to the weather- I was inspired to create today's card.


The sentiment stamp is from the Just My Type Stamp Set.  Here- I've colored it with the Basic Black. Stampin' Write Marker as well as Melon Mambo, Pumpkin Pie, Daffodil Delight, Garden Green, Pool Party and Fresh Freesia Stampin' Write Markers.  I thought it only fitting that the word rainbows was actually rainbow colored.  

I used the Rays Of Light background stamp to create the sunshine in the sky.  I inked it in Daffodil Delight Ink onto a piece of Lemon Lolly Card Stock.  Then using the Stylish Shapes Dies- I cut a Daffodil Delight circle to create the sun.  The clouds were cut from Basic White and Vellum Card Stock.  A Lemon Lolly and White Baker's Twine bow was added for interest.  

Thanks for stopping by!  Please be sure to click the links below to navigate throughout the hop!  BACK will take you to Cheryl Curtis and NEXT to Elizabeth Price.