Wednesday, October 25, 2017

Hot Cocoa Snow Globe Details

Oh my goodness!  I never expected the response that I have received for the adorable little Hot Cocoa Snow Globes.  I literally have answered hundreds of questions today and have several more that I have yet to answer.  For this reason- I have decided to share a little more information here on my blog.

But first and foremost- I wanted to thank everyone for all the emails, comments and questions!  I have enjoyed reading and answering them all!  It always makes me smile to know that something I created is liked by others!

The plastic ornaments that I used were purchased at Michaels.  They are 70mm BUT they do not have any marking on the packaging that state that they are 70mm.  The ornaments are NOT available from Michaels.com.  You actually have to go to the store to get them.  If you do go to the store- look for the ornaments that are priced $1.29 and look like the picture below.


The ornaments also come with a little tab at the top.  Carefully cut the tab off using Paper Snips.  You won't be able to see where the tab used to be as the ribbon covers the mark up.


To create the mini penguin- you will need the following supplies:
Basic Black Card Stock
Whisper White Card Stock
Real Red Card Stock
Pumpkin Pie Card Stock
Big Shot
Many Mittens Framelits
Fox Builder Punch
Paper Snips
Adhesive of your choice (I prefer Multipurpose Liquid Adhesive)

Please note that this little cutie was originally created by Donna Griffith from the Stampin' UP! Home Office.  Another demonstrator shared the picture tutorial and I just created my own from there.  
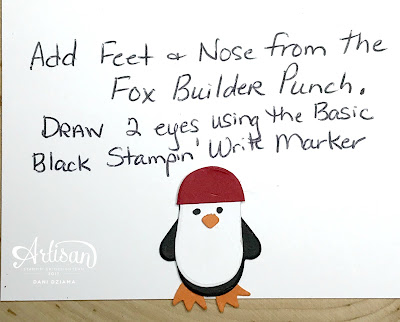
Below is a mini tutorial on how to create a penguin of  your own.  Just for future reference- there is a larger mitten in the Many Mittens Framelits that can be used to create a larger penguin!  You just have to freehand the feet and nose!

Step 1:

Step 2:

Step 3:

After your penguin is assembled- the only thing left to do is to embellish the hat!  I used the Mini Tinsel Trim Combo Pack BUT you can use anything you want!  Skinny ribbons, rhinestones, pearls, anything goes!

Super simple and way too cute!

Some tips I've learned along the way- when adhering the dome to the metal lid- use the super glue sparingly!  Using too much super glue doesn't allow the project to properly dry and it also leaves a nasty residue that you will not be able to get rid of.  So use enough to adhere the dome but use it sparingly!

Don't get super glue on your fingers or else you'll stick to your project (don't ask me how I know LOL).

Punch a 2" circle from the 2" Circle Punch and adhere it to the top of the flat lid.  This helps hide the silver coloring on the flat lid.  

Hot glue the penguin's feet to the center of the white circle on the flat lid.  The hot glue helps hold the penguin upright.  Use Mini Glue Dots to adhere the Merry Christmas banner to the front of the penguin.  

For the snow- you can use either powder snow like I did or you can use polyfill.  If you use powder snow like mine- you will need to super glue your flat lid to the inside of your jar ring.  Otherwise the snow will fall out of the dome and go all over inside your hot cocoa.  If you use the polyfill-it will stay in place but takes up more room in the dome and isn't as fun as polyfill stays in one place where powder snow moves around.  Just be sure not to overfill with snow or you will not see your elements.

I hope you will find this information helpful!  As always- if you have questions- please feel free to let me know!


Tuesday, October 24, 2017

Mini Hot Cocoa Snow Globes

*****EDITED:  I'M CURRENTLY AT WORK HOWEVER AS SOON AS I GET HOME I WILL UPLOAD A PICTURE TUTORIAL ON HOW TO CREATE THE PENGUIN.  IF YOU NEED IT BEFORE 7PM TONIGHT- THE PICTURE TUTORIAL CAN BE FOUND ON MY FACEBOOK PAGE https://www.facebook.com/DanisThoughtfulCorner ****

Hey there stampers!  I hope you're ready for a cuteness overload because tonight's project is adorable!  I've seen a ton of these super cute mini cocoa jars with snow globe toppers on Pinterest lately and I couldn't resist making my own!  

If you've been following my blog lately- you've probably noticed that I'm in love with the adorable little penguins that Donna Griffith from the Stampin' UP! home office created.  They are so stinkin' cute!  Super easy to create too!

I originally thought about using the Seasonal Chums bundle to create my jars but the little tags were too big to fit inside the domes.  So I needed a plan b...


And those cute little penguins strike again!  They are pretty much irresistible.  Or at least they are for me!


To create these little cuties- I used a 4 oz. canning jar, half of a 70mm fillable ornament, powder snow, the penguin embellishment, a Merry Christmas banner, and a tiny Linen Thread bow.  The jars are filled with Hot Chocolate mix.  


I began by adhering the dome to the outer ring of the canning jar using super glue.  This fits perfectly but you'll need to hold it in place for a minute or two until the glue sets.  I then began decorating the flat lid to the canning jar.  I used a 2" Whisper White circle and adhered it to the center of the flat lid.  I then added the penguin and Merry Christmas banner.  The Linen Thread bow was added to the left side of the sentiment banner.  I poured some powder snow into the dome (careful to not add too much or you'll cover up the sentiment).  I then placed another thin layer of super glue on the under side of the ring to hold the lid in place (and to keep the snow inside the dome).  Fill the jar with cocoa or other treats and carefully screw the domed lid on.  I added the Quilted Christmas Ribbon around the edge of the dome so it would hide the seam where the dome was glued to the ring.

See?  Pretty cute, aren't they?

Thanks for stopping by!

Sunday, October 22, 2017

Monday Montage #103


Hello there and welcome back for the bi-weekly Monday Montage blog hop. I'm so happy you joined us!  Be sure to visit all 10 stops to see what other amazing designers have created to share with you.

My project tonight is one of the many items I've been busy creating for my upcoming craft show season.

These Mini Hand Sanitizers are always a huge hit.  People love to purchase them as teacher gifts, co-worker gifts, or stocking stuffers and I always sell completely out.  I'd say that makes these a HUGE HIT!


The fabulous Erica Cerwin shared a video tutorial on how to create these a year or so ago.  They take very little time to create so if you need to make multiples- you can do it easily with these!


Every year- there is an assortment of colors and scents to choose from for the hand sanitizers.  This one was created using the Snowkissed Citrus scent.  It's probably my favorite scent of the season!


Aren't they adorable?


Won't you join us for the rest of the hop?  Simply click the NEXT button to go to the fabulous Elizabeth Price or click the BACK button to head on over to the lovely Cathy Casey.  Thanks for stopping by!


Thursday, October 19, 2017

Stampin' UP! Artisan Design Team Blog Hop- Count My Blessings

Hey there stampers!  Welcome back to another Stampin' UP! Artisan Design Team Blog hop!  If you are hopping with us today then you may have arrived here from the fabulous Cathy Caines.  Isn't she amazing? As we are a group of 20 demonstrators from around the world- our blogs are written in many different languages.  Please be sure to use Google Translate so that you can follow along in your language.  You don't wanna miss out on any of the fabulous details!

My project tonight is a gorgeous fall card created using the Count My Blessings Stamp Set, the Leaflets Framelits Dies and the Painted Autumn Designer Series Paper.


To create this card-  I began by die cutting a set of 3 leaves.  After the leaves were cut out I then ran them through the Big Shot using the Pinewood Planks Dynamic Impressions Textured Embossing Folder and the Seaside Textured Impressions Embossing Folder.  This added a bit of texture and dimension to the card.


The smallest leaf was cut from a scrap of the Painted Autumn Designer Series Paper.  I tied a tiny Linen Thread bow to accent the leaf bouquet.


If you zoom in you will see that there is a spray of Soft Sky ink splatter all across the top card layer.  This adds a bit more texture and interest to the card. 

Thanks for stopping by!  I hope you will join us on our journey around the world today!  The fabulous Holly Stene will be your next stop on the hop.  Check it out!  She has a gorgeous project in store!


Wednesday, October 18, 2017

Color Me Happy part two

Hello there!   Last night I shared a card that was created with the soon to be released stamp set called Color Me Happy and the brand new Stampin' Blends alcohol markers.  Tonight I have part two.... 


I must admit that when I first saw the Color Me Happy Stamp Set- I didn't think it was my style.  Oh my!  Was I ever WRONG! It's totally my style and I absolutely love it!  


The card above was created using both the light and dark Pool Party Stampin' Blends.  I began by coloring the entire bird image in using the Light Pool Party Stampin' Blend.  I then went back around the edges with the Dark Pool Party Stampin' Blend.  Using the Light Pool Party Stampin' Blend- I began to blend the colors together.  I added a little Light Bermuda Bay Stampin' Blend around the edges as well to highlight the bird.


For the second card- I used both the light and dark Pink Pirouette Stampin' Blends.  Once again- I began by coloring the bird with the lightest color first.  I then added the darker color around the edges of the bird, blending the colors together using the Light Pink Pirouette Stampin' Blend.  I highlighted the accents on the bird using the Light Rich Razzleberry Stampin' Blend.  

Are you as excited about the new Stampin' Blends as I am?  Remember- they go on sale November 1, 2017!  


Thanks for stopping by!  

Tuesday, October 17, 2017

Color Me Happy

Hey there!  Tonight I have the best news to share with you!  The Stampin' UP! Blends (new alcohol markers) will be available to everyone on 11/1/17!  How awesome is THAT?  I cannot wait for you to try them out!  You will absolutely LOVE them!  

My project tonight features the Blends and a new stamp set called Color Me Happy.  I can't begin to tell you just how much I adore this new stamp set.  It's cute, fun and perfect to use with the Blends.  


These adorable lanterns are perfect for a celebration!  To create the lanterns I began by using the Light Daffodil Delight Blends.  I then added other Blends colors beginning with the lightest color first (and coloring directly over the Daffodil Delight) and then around the edges I added the coordinating dark color.  I then blended them all together using the Color Lifter.


Such a fun card and I couldn't be happier with how it turned out!  I'm new to using alcohol markers so this is a learning experience for me.  I don't think it turned out too bad!


Thanks for stopping by!

Card Ingredients:
Whisper White Notecards, Pink Pirouette Card Stock, Silver Metallic Thread, Doilies, Stampin' Blends, Color Me Happy Stamp Set, Pink Pirouette ink, Memento Black ink.

Sunday, October 15, 2017

Smitten

Good evening stampers!  Tonight I have the cutest project to share.  Donna Griffith from Stampin' UP! showed how to create THE most adorable penguin I have ever seen.  I just couldn't resist using her little tutorial to create one of my own.  


After I made the little fella I had to figure out what to do with him.  I could have made him a tag or put him on a card but I chose to put him on a mitten notebook.  These mini notebooks can be created from virtually any shape.  You simply need to cut out a 2 covers and about 15 sheets of "paper" (I create mine from index cards).  Easy peasy and super cute!

Here's what the inside looks like.  People often ask how I cut my index cards.  Simply put- I cut 3 at a time and I align my framelit so that the red line on the index card creates a "top" to the paper.  Just like you would see on a regular notebook.  


These are super cute and easy to create.  You can easily whip up a bunch of these in no time!  They are the perfect little stocking stuffers, gifts for coworkers, or to pass out as business cards (be sure to put your info on the back!).  However you choose to gift them they are sure to be loved!


Thanks for stopping by!


Sunday, October 8, 2017

Monday Montage # 102


Hello there and welcome back for the bi-weekly Monday Montage blog hop. I'm so happy you joined us!  Be sure to visit all 10 stops to see what other amazing designers have created to share with you.

My project tonight is one of the many cards I created for World Card Making Day.  I started out not knowing what I wanted to create but  as I started looking through my stamps- I came across the Christmas in the Making Stamp Set.  This set is featured in the Holiday Catalog and it is SO fun!


To color the dress I used the new Stampin' Blends.  They are amazing!  I cannot wait for you all to be able to purchase them!  I used the light Old Olive and the light Cherry Cobbler to color the dress.  The holly leaves on the dress and the ornament were colored using the dark Old Olive and dark Cherry Cobbler. 


To make the dress a little fancier I first stamped the lady image onto a piece of plaid DSP from the Christmas Around the World DSP.  I then carefully cut out just the bottom portion of the dress and adhered it to the bottom portion as shown in the picture.

Thanks for stopping by!  I hope you have enjoyed my World Cardmaking Day card!

  Won't you join us for the rest of the hop?  Simply click the NEXT button to go to the fabulous Elizabeth Price or click the BACK button to head on over to the lovely Cathy Casey.  Thanks for stopping by!


Thursday, October 5, 2017

Stampin' UP! Artisan Design Team Blog Hop- Merry Patterns

Hey there stampers!  Welcome back to another Stampin' UP! Artisan Design Team Blog hop!  If you are hopping with us today then you may have arrived here from the fabulous Cathy Caines.  Isn't she amazing? As we are a group of 20 demonstrators from around the world- our blogs are written in many different languages.  Please be sure to use Google Translate so that you can follow along in your language.  You don't wanna miss out on any of the fabulous details!

My project today is home decor holiday sampler.   For this piece I have created an assortment of  individual scenes using the Merry Patterns Stamp Set and a variety of other products. (All products used to create this gorgeous piece are listed below at the end of this post)


The frame itself is a shadowbox and is large enough for a 12" x 12" piece of DSP.  
Each individual square has it's own scene.  Some of them coordinate with another square and others are just individual.  

Here's what the sampler looks like without a frame.  It was photographed this way to try and show the detail a little better than what can be seen inside the frame.  


How would you like a Merry Patterns stamp set of your own?  You can earn this gorgeous stamp set by simply hosting a party with $300 USD in sales.  Did you also know that there's also sale on Designer Series Paper?  Your guests will love shopping from our selection of our Designer Series Paper, now ON SALE—making it even easier for you to hit your $300 USD goal and earn your free holiday stamp set.  Don’t miss this fun opportunity!  This promotion ends on October 31st!

Thanks for stopping by!  I hope you have enjoyed my project!  Be sure to check back for more fabulous ideas using the Merry Patterns Stamp Set!


Sunday, October 1, 2017

Happy Owloween!

Hey there stampers!  I saw an idea that I absolutely loved in the quarterly Stampin' Success magazine. The picture showed a mason jar that has been stamped and decorated accordingly.  I figured I'd try the technique out for myself! 

Mine however is for Halloween instead of Christmas.  I adore the Spooky Cat Stamp Set and the owl image is my favorite.  Don't you just love the Happy Owloween sentiment?  It's the perfect match to my owl!


To create my jar- I stamped the owl image into Basic Black Archival Ink and then immediately stamped it onto the smooth side of the jar.  I then carefully peeled the stamp off the jar.  Using the Heat Tool I set the ink.  So easy and oh so cute!


Just in case you're curious as to the size of the jar- it only holds 4 ounces.  Yep- SUPER tiny!  These tiny mason jars are adorable. They are the perfect size for gift giving.

Thanks for stopping by!