I apologize for the lack of blog posts lately. I am actually out of town on a little vacation. Today, I am in New York City. We are going to go to the 9/11 Memorial and then to 5th Ave to shop for a while. Later tonight we will be heading to Radio City Music Hall to see Jack White perform.
I made a few items before I left to share on my blog. Today's card is actually a card that I created for a friend's baby shower. My friend and her husband are HUGE Pearl Jam fans so I thought it would be cute to make a baby onesie card that resembled a concert t-shirt.
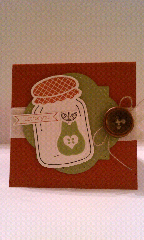
Here is what I came up with:

I know that a skull and crossbones isn't exactly what you would expect to find on a baby onesie however Pearl Jam fans absolutely love it!
Card Ingredients:
Card Stock: Midnight Muse, Cherry Cobbler, Whisper White
Card Stock: Midnight Muse, Cherry Cobbler, Whisper White
Tools: Paper Trimmer, 1 3/4" Scallop Circle Punch, 1 3/8" Circle Punch, Paper Snips, SNAIL, Stampin' Dimensionals, MDS (My Digital Studio)


