Monday, July 31, 2023

Monday Montage#241


I am on a fun fold card kick lately!  This is the first in a series of about 15 that I've made using this particular style card. They are fast, super easy to create and oh so cute!  The hardest part is choosing what DSP/stamps to use.

For my card- I've used the Masterfully Made DSP, Gorgeously Made Stamp Set and coordinating Gorgeously Made Dies as well as Fresh Freesia,  Pretty Peacock, Azure Afternoon and Basic White Card Stock.  

This is the front of the card.  From this view it looks pretty much like a regular card however...


Simply open the first panel to reveal the first inside panel.  


Open the second panel and you'll see a third panel!  On this particular card- I didn't leave room to sign the card.  I was debating whether or not I'd adhere the DSP layer to a card base or if I'd leave it as is.  Since I chose to leave it as is- I'll be using a post it note to include my personal message to the recipient.


I'm not really sure what this card is technically called or who created it originally (I found so many versions when I was looking for fun folds).  But I've seen it mostly as a trifold accordion card.  

Want to make one too?  It's SO easy!  Simply begin by cutting a piece of DSP that measures 12" x 5-1/2".  Score at 1-3/4", 4-3/4" and at 7-3/4".  
First score line (1-3/4") is a valley fold.  Second score line (4-3/4") is a mountain fold.  Third score line (7-3/4") is a valley fold.
Adhere the middle fold closed using Stampin' Seal.

To decorate the card- It doesn't really matter what shape you use for your image panels as long as they are all the same size/shape.   It can be circles, squares, rectangles- anything really!

1. Center and adhere the first stamped panel to the 1-3/4" panel. (Only apply adhesive to the left side of the panel)  Open the first panel so the second panel is exposed.  
2. Line up the second panel with the back of the first panel, and adhere using Stampin' Seal.  (Only apply adhesive along the left part of the panel- otherwise it will stick to the 3rd card panel)
3.  Line up the third stamped panel with the back of the second panel.  Apply adhesive to the entire back of the panel and fold the back of the card closed.  
All 3 panels should now be aligned with only the first panel visible.
Tip:  Don't use Stampin' Dimensionals to decorate the inside panels as it makes them too thick causing them not to close properly. 


 Thanks for stopping by!  Please be sure to click the links below to navigate throughout the hop!  BACK will take you to Cheryl Curtis and NEXT to Elizabeth Price.  


Friday, July 28, 2023

TGIFC#431


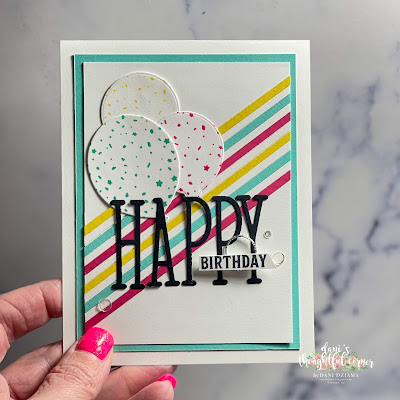
Good morning!  Welcome back for another TGIF Challenge.  Today we have an Inspiration Challenge!  For this challenge- we could choose whatever we were inspired by from the picture above.  It could be the stripes, dots, sentiment, the cupcake images- whatever!

I chose the bright stripes and the big sentiment and created a fun Birthday card.  What would you chose as your inspiration?


Why not join in on the fun and create a card of your own?  Simply create a card using the above sketch and submit it on the TGIF Challenges blog using the guidelines below!

Deadline for challenges is Thursday 8/03/2023 at 10am PST.


  • Uploaded projects need to be direct linked to your blog, Facebook, or other on line gallery.
  • Please post the TGIF Challenge graphic on your blog and link back to our site
  • Your project MUST be new and inspired by our challenge parameters
  • When sharing your project publicly, please use this weeks hashtag- #TGIFC431
  • Winning project(s) will be posted on next week's challenge on Friday 8/04/2023
  • Questions should be left in the comment section
  • Challengers can even post your cards on our FB page too!!  "Like us" while you're there :-)

Monday, July 17, 2023

Monday Montage #240: Happy Birthday!


Do you keep a stash of cards on hand?  I love having a bunch all ready to go and this card was perfect to add to the stash!  Created using the Alphabet A La Mode Dies, Beautiful Balloons Dies, Basics 3D Embossing Folders and the Zany Zoo Stamp Set- this fun birthday card features a rainbow of watercolored balloons and the traditional Happy Birthday To You sentiment.


The HAPPY sentiment looks 3 dimensional thanks to the fabulous Foam Adhesive Sheets.  To create the Sentiment- I stamped the word birthday first- then line up the to you portion of the sentiment after as the stamp itself reads:
Happy
Birthday
To You
and not all in one line as it is on the card.  

The Balloons were watercolored using the following colors:  Melon Mambo, Flirty Flamingo, Pumpkin Pie, Daffodil Delight, Granny Apple Green, Azure Afternoon, Highland Heather and Fresh Fresia.


The card was finished by adding a tiny white Baker's Twine bow (Baker's Twine Essentials Pack) and 3 pearls from the 2022-2024 In Color Pearls.

Thanks for stopping by!  Please be sure to click the links below to navigate throughout the hop!  BACK will take you to Cheryl Curtis and NEXT to Elizabeth Price.  


Friday, July 14, 2023

TGIFC #429 Sketch Challenge


Good morning!  Welcome back for another TGIF Challenge.  Today we have a super fun sketch!  I love sketch challenges as the difficult part of creating is already done!  Simply choose your card stock/DSP, stamps/embellishments and that's it! 


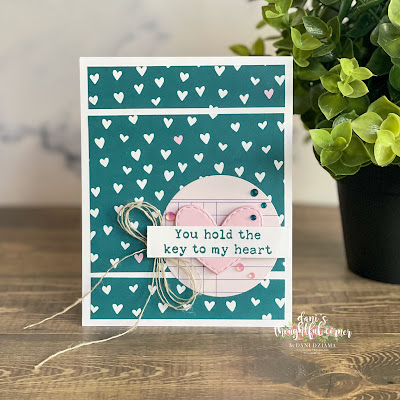
I chose the Pretty Peacock/white heart pattern DSP from the Delightfully Eclectic DSP as my background.   I then added a notebook paper circle (also from the Delightfully Eclectic DSP) to hold the main focal image.  The circle was cut using the largest circle die from the Reach For The Stars Dies.  I cut three Bubble Bath hearts from the Celebrations Tag Dies (retired) and adhered them together using Stampin Dimensionals to create the illusion of a 3 dimensional heart.  The sentiment is from the Just My Type Stamp Set.  I added a Linen Thread Bow and a few Loose Frosted Dots for interest.


 Thanks for stopping by!  
Why not join in on the fun and create a card of your own?  Simply create a card using the above sketch and submit it on the TGIF Challenges blog using the guidelines below!

Deadline for challenges is Thursday 7/20/2023 at 10am PST.


  • Uploaded projects need to be direct linked to your blog, Facebook, or other on line gallery.
  • Please post the TGIF Challenge graphic on your blog and link back to our site
  • Your project MUST be new and inspired by our challenge parameters
  • When sharing your project publicly, please use this weeks hashtag- #TGIFC429
  • Winning project(s) will be posted on next week's challenge on Friday 7/21/2023
  • Questions should be left in the comment section
  • Challengers can even post your cards on our FB page too!!  "Like us" while you're there :-)

Friday, July 7, 2023

TGIF Challenges: Color Challenge


Good morning!  Welcome back for another TGIF Challenge.  Today we have a fun color challenge!  We are creating cards that use the following colors:  Lemon Lolly, Sweet Sorbet and Basic Black.  I paired those 3 colors with the Sweet Citrus Stamp Set and coordinating Sweet Citrus Hybrid Embossing Folder.  


Very simple card to create- I used the Sweet Citrus Hybrid Embossing Folder to create the background on the Basic White layer.  I then colored the centers of the lemons using a Blending Brush and Lemon Lolly Ink.   The leaf images were stamped in VersaMark ink and then heat embossed using the Basics Embossing Powders (White) and the Heat Tool.  Several flowers were stamped in Sweet Sorbet and cut out to add interest.

 Thanks for stopping by!  
Why not join in on the fun and create a card of your own?  Simply create a card using the above sketch and submit it on the TGIF Challenges blog using the guidelines below!

Deadline for challenges is Thursday 7/13/2023 at 10am PST.


  • Uploaded projects need to be direct linked to your blog, Facebook, or other on line gallery.
  • Please post the TGIF Challenge graphic on your blog and link back to our site
  • Your project MUST be new and inspired by our challenge parameters
  • When sharing your project publicly, please use this weeks hashtag- #TGIFC428
  • Winning project(s) will be posted on next week's challenge on Friday 7/14/2023
  • Questions should be left in the comment section
  • Challengers can even post your cards on our FB page too!!  "Like us" while you're there :-)

Monday, July 3, 2023

Monday Montage #239


Hello stampin' friends!  It's been cloudy and overcast here in Ohio for the past few weeks (lots of smoke from the Canadian wildfires has settled here in the Ohio River Valley).  It feels like we haven't seen the sun in forever.  Thanks to the weather- I was inspired to create today's card.


The sentiment stamp is from the Just My Type Stamp Set.  Here- I've colored it with the Basic Black. Stampin' Write Marker as well as Melon Mambo, Pumpkin Pie, Daffodil Delight, Garden Green, Pool Party and Fresh Freesia Stampin' Write Markers.  I thought it only fitting that the word rainbows was actually rainbow colored.  

I used the Rays Of Light background stamp to create the sunshine in the sky.  I inked it in Daffodil Delight Ink onto a piece of Lemon Lolly Card Stock.  Then using the Stylish Shapes Dies- I cut a Daffodil Delight circle to create the sun.  The clouds were cut from Basic White and Vellum Card Stock.  A Lemon Lolly and White Baker's Twine bow was added for interest.  

Thanks for stopping by!  Please be sure to click the links below to navigate throughout the hop!  BACK will take you to Cheryl Curtis and NEXT to Elizabeth Price.