Thursday, January 25, 2018

Fancy Friday Blog Hop


Hello there and welcome to another Fancy Friday Blog Hop!  Our theme this month is "Mail it Monday".  This was a challenge to create 2 avid and fancy cards with coordinating envelopes.  
Since Valentine's Day is rapidly approaching I thought it fitting to get a head start on my Valentine's.

  
This card is my favorite card....ever.  The combination of Whisper White Craft Ink on the Crumb Cake Card Stock is pretty but that striped heart with teeny tiny Real Red roses- LOVE!!!!


The roses were created using a Real Red Card Stock scrap and the 3/4" Circle Punch.  Simply spiral cut the circle and roll it up!  Add a Pearl Basic Jewel for the center for an extra special touch!


As you can see from the picture- the envelope is very basic.  I added a small strip of Petal Passion DSP to the flap.  I would have gotten more creative but I didn't want the envelope to be prettier than the card!


My second card is actually a CASE of a card that I created last year for one of the Artisan Design Team hops.  I loved the design and thought it would look amazing as a Valentine.  Guess what- I was right!  Look how cute it is!


Just as before- I used a Crushed Curry scrap and the 3D Dynamic Textured Embossing Folder that creates Hexagons. It creates the perfect bee's wax.  To add more dimension- I used Stampin' Dimensionals to help separate the white layer from the honeycomb.  The bees were stamped 4 times and cut out using the coordinating Detailed Dragonfly Thinlits.  I colored each body with the Crushed Curry Stampin' Write Marker.  The wings were colored with Soft Sky.  A Mini Stampin' Dimensional adheres the bees together.  After the bees were assembled I applied several layers of Clear Wink of Stella to make them sparkle.


See the adorable sentiment?  I created it using the Bloomin' Love stamp set.  It started out as a simply Be Mine sentiment but since I have bees on my card my sentiment needed to say Bee Mine!

The envelope for this card was created using the Butterfly Basics stamp set.  I carefully stamped the honeycomb image all over the front of the envelope.  Stamped a bee and added some teeny tiny hearts.


Thanks for stopping by!  I hope you have enjoyed my projects!  Please click the NEXT button below to be visit the lovely Rochelle.  Please click the  NEXT button to travel along with us!  Thanks for stopping by!


SaveSave

Sunday, January 21, 2018

Monday Montage #108


Hello there and welcome back for the bi-weekly Monday Montage blog hop. I'm so happy you joined us!  Be sure to visit all 9 stops to see what other amazing designers have created to share with you.

For my projects tonight I have chosen to use the Petal Passion Designer Series Paper and two of my favorite stamp sets from the Occasions Catalog-  Heart Happiness and Sure Do Love You.  Since I love to make Valentine's- I thought it would be the perfect time to start!


For the card- I began by using a 4" x 5-1/4" layer of Petal Passion DSP.  I then sewed along the edges.  You'll notice that on both the left and right sides of the card I sewed a zigzag pattern to add interest.


I love all the little details in the gold heart above.  It's a solid stamp however if you look closely- you'll see that the heart itself is made up fo lots of little hearts connected together to form a larger heart.  


For the little milk boxes- I am not the original creator of those.  I CASED The Paper Pixie.  She created a mini video tutorial and shared it on her page. If you need the tutorial- be sure to click above.   
The little milk cartons are so simple to create and SUPER cute! 

On some of the hearts- I used the Heart Happiness Stamp Set and the Sweet & Sassy Framelits to create smaller hearts (but with patterns).  To do this- I simply stamped the larger striped heart and cut out a small heart from the center of the stamped image.

Here's a close up so you can see just how tiny they are!  I made a bunch for my co-workers for Valentine's Day.  I LOVE them because you can get 8 from one sheet of 12" x 12" paper.  That makes them pretty inexpensive when needing to make multiples!


Won't you join us for the rest of the hop?  Simply click the NEXT button to go to the fabulous Elizabeth Price or click the BACK button to head on over to the lovely Cathy Casey.  Thanks for stopping by!


Thursday, January 11, 2018

Sale-A-Brate the Occasions Blog Hop

Hey there stampers!  Surprise! I have joined the One Stamp At A Time Blog Hop Team!  I'm so fortunate to be able to hop with such a talented group and I cannot wait to see what everyone has to share this month!  

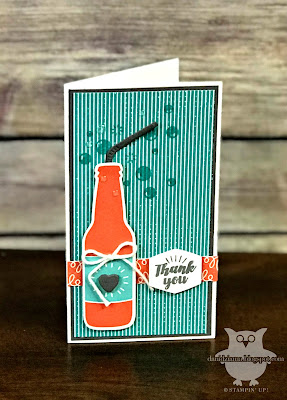
To start the year off, we are Sale-A-Brating the Occasions!  Our projects this month focus on items from the Sale-A-Bration and Occasions Catalogs.  For my projects I chose my new favorite stamp set from the Occasions Catalog.  It's called Bubble Over.  This set is a series 17 stamps with sentiments and images to match.  I also used the coordinating Bottles & Bubbles Framelits as well as the Bubbles & Fizz Designer Series Paper.  


This set consists of 4 mini cards- each measuring 2-1/2" x 4-1/2".  These are the new Whisper White Narrow Note Cards & Envelopes.  Not only are they adorable but they are perfect so stick in lunch boxes, shirt pockets, on top of the pillow....anywhere really!  What a great way to let someone special know that you're thinking about them!


These are the four cards.  Some of the bottles were stamped with the Bubble Over Stamp Set and some were die cut from the coordinating Bubbles & Fizz DSP.


It's a little difficult to see in the picture above but I have used the new Glitter & Clear Epoxy Shapes to add a little something extra to the card.


One of my favorite things about the Bottles & Bubbles Framelit Dies is the straw.  You can't really see it in the picture but if you look real close- there are ribbed marks where the straw bends making it more realistic.  Way too cute!


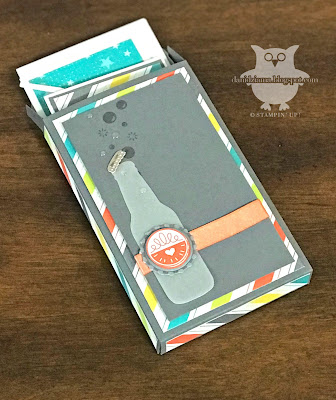
Don't want to have an open bottle on your card?  No worries!  There's a bottle cap framelit for that!  I used the Champagne Foil Sheets to create the bottle cap on the card above.  Super cute!


The colors in the suite are awesome!  They are fun, bright and cheerful!  They are Basic Gray, Bermuda Bay, Calypso Coral, Daffodil Delight, Lemon Lime Twist and Whisper White.  With these colors something can be created for just about anyone!

I couldn't create a set of cards and not make a cute box to store them all.  The Lots to Love Box Framelits Dies create the perfect storage solution!


The picture below shows what the box looks like when it's open.  Since the box is only around 3/8" thick- it will store approximately 4 cards and envelopes.  It will hold less if each card has a lot of embellishing.


I hope you have enjoyed my project for this month!  It's been a fun one to create! 

Happy Stampin'!