Monday, May 21, 2018

Monday Montage #116- Abstract Impressions


Hello there stampers!  Welcome back to another edition of Monday Montage.

Tonight I'm sharing a few projects that I created using the Abstract Impressions Stamp Set from the upcoming 2018-2019 Stampin' UP! Annual Catalog.
This stamp set has 21 fabulous images.  There are sentiments, flowers, and leaves.  BUT you can use them in any way you want!  Don't want to use the leaves as a leaf?  Why not make them a butterfly!  The possibilities are endless with this gorgeous set!

For my first card- I cased the Abstract Impressions video from Stampin' UP!.  I loved how colorful the flowers on this card were and wanted to re-create it for myself.


The colors used were:  Petal Pink, Calypso Coral, Melon Mambo, Crushed Curry, Soft Sea Foam, Shaded Spruce, and Pacific Point.  They are all so pretty together!


In the video- Stampin' UP! had used the Metallic Ribbon Combo Pack however I did not have that ribbon so I used the new 5/8" Polka Dot Tulle Ribbon instead.  It's so pretty and ties nicely!

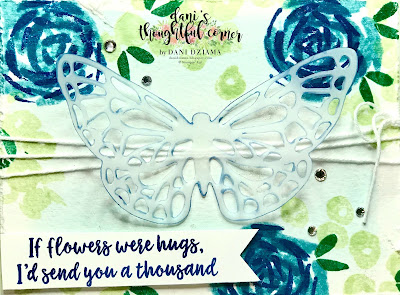
For the second card- I was just playing around but I kinda like it!  The blue roses are beautiful and this picture really doesn't do it justice!  

I began creating the card using a piece of Watercolor Paper and a Balmy Blue watercolor wash.  After the wash dried-  I then began adding the roses and other accents.  


To create the roses- I used a combination of Balmy Blue, Pacific Point and Blueberry Bushel.  I originally watercolored a butterfly that I had cut out using the Springtime Impressions Thinlits however I liked the Vellum version better.  


For the Vellum butterfly- I used the Light Night Of Navy Stampin' Blend to completely outline the butterfly and it's wings.  To do this- I simply laid the butterfly down onto a piece of Grid Paper and outlined it all areas that had been cut out by the thinlit.  

Overall I think it came out cute!
Is this bundle on your wishlist?  If not- it should be!  It is gorgeous!


Do you need a new Annual Catalog?  Send me an email and I will drop one in the mail for you!


Monday Montage Hoppers

Tuesday, May 15, 2018

A teeny tiny boat...

Hello there!  Just when I thought it couldn't get any cuter than the adorable boat I shared yesterday- out comes these!  I have so many ideas swimming around in my head right now for this product suite.  I just can't get enough!


What are they you ask?  Why they are cupcake toppers!  Since I branded the boat I shared yesterday with the Stampin' UP! logo- I thought it fitting that the cupcake toppers be somewhat related.  


What started out as a birthday party ensemble has quickly become the theme for my Annual Catalog Launch Party!  It's going to be so fun!  Interested in joining me?  Message me for details!

How cute are these little boats anyway?  They only measure approximately 1-1/2"!  They are beyond adorable.  Please excuse my poor photography.  The lighting wasn't the best tonight.  


These are truly a cinch to create!  Simply google an Origami Boat tutorial and you will be well on your way!  


How about the adorable little banners?  The little pennants were created using the Thrill Ride Thinlits.  The I ❤stamping banner was created using the Apron of Love stamp set.  

So fun!  Are you totally loving what you see?  Leave me a comment!  I'd love to hear from you.  Wanna see something different?  Email me a suggestion!  

Thanks for stopping by!


Sunday, May 13, 2018

Warning: Cuteness Overload...

Good evening stampers!  As I'm sure you may have guessed- I'm just a little bit obsessed with the new Tranquil Textures Product Suite.  All for good reason!  It makes amazing projects!  The gorgeous designer series paper, the colors, the framelits...I could go on an on and on.  

My project tonight is stinkin' cute!  Don't say I didn't warn you!


I created an origami style boat from a piece of Tranquil Textures Designer Series Paper.  The Under The Sea Framelits were the perfect accent to this semi docked boat.  

The little anchor was stamped using the soon to be retiring Seaside Shore stamp set.  Then it was fussy cut  and attached to the boat using Linen Thread.

My favorite element from the Under The Sea Framelits is the fishnet.  Since I wanted to fishnet to appear well used- I first die cut a piece of Crumb Cake card stock.  Then crumpled the fishnet in my hand several times to give it a distressed look.  I folded the edge over the inside of the boat and secured it using a Glue Dot.


The Stampin' UP! logo was used to brand the sail at the top of the boat.  I LOVE how this turned out and I hope you do too!

Thanks for stopping by!

My boat fits in perfectly with the Stamp, Ink, Paper Challenge #150 this week!  Click their image below to visit the site and participate in the challenge! 


Friday, May 11, 2018

Sea of Textures Take 2

Hey there stampers!  Yesterday I shared a card and an adorable 3 dimensional project that I created for the OSAT Blog Hop.  I had actually created a few other cards that coordinated with my projects from yesterday as well but figured I'd save them for individual posts.  SO- here is take 2!


As you can see- it's created with the same basic layout as the card from yesterday.  Once again I have used a porthole as the main focal point only this time- the octopus is inside the porthole peeking out.  The remainder of his body is behind the porthole as though he is reaching out.  
Hence my choice in sentiments!

Like yesterday's card- today's card is also a shaker card that features the Tranquil Textures Sprinkles. They may just be my new favorites!


Isn't it a fun card?  I love how well this set pairs with the Wood Textures Designer Series Paper.  I'm so happy that it's carrying over into the new 2018-2019 Annual Catalog!

Thanks for stopping by!


Thursday, May 10, 2018

OSAT- On The Red Carpet

Hey there stampers! Welcome back for another fabulous One Stamp At A Time Blog Hop!  This month our theme is On The Red Carpet.  We are featuring projects that were created using brand new products from the 2018-2019 Stampin' UP! Annual Catalog.  

I'm featuring the Tranquil Textures suite.  This suite contains a stamp set called Sea of Textures, Under the Sea Framelits, Tranquil Textures Cardstock pack, Tranquil Textures Designer Series Paper, and Tranquil Textures Sprinkles.  

Wozers!  Where do I begin?  To say this suite is amazing is a total understatement.  I can't even find the right words to use to describe how awesome this suite actually is.  If you love texture- it's got plenty!  Do you love bold bright colors?  Check!  Fun images?  Got it!  


The first project I created was the hot air balloon.  Why you ask?  I don't really know!  An idea popped into my head and I went with it!  


I used the largest Circle Stitched Shapes Framelit and the smallest Square Stitched Shape Framelits to create the actual balloon.   


The basket was decorated with a piece of Crumb Cake Tranquil Textures Designer Series Paper.  The piece I used looked like it had tiny bubbles all over it.  I created several die cuts using the Under The Sea Framelits and a combination of Tranquil Textures DSP,  Fresh Fig/Night of Navy/Crumb Cake/Whisper White Card Stock.  The edges of the sand dollar were sponged with CrumbCake Ink.  


Don't let the pictures fool you!  This little cutie barely measures 5-1/2" tall!

Next up was the card.  I know right away what I wanted to create.   You see years ago when my family went on a cruise- we had a picture taken of our kids. While on board the ship there was an assortment of picture frames.  Most of them were basic frames but one stood out in particular.  It was a porthole.  I always thought it was a fun way to display the kids picture from the cruise.  


To create the porthole I began by using the Layering Circles Collection Framelits.  I used the largest circle to create the base.  The porthole opening was created using the 4th smallest circle and the 6th smallest circle.  The Touches of Texture Stamp Set was used to create the "rust" on the frame.  The porthole frame was distressed using both Cajun Craze ink and Crumb Cake ink.  


I hope you have enjoyed my projects for today!  

Please use the links below to follow around on the hop with us!  We have LOTS of gorgeous creations to share!

Thanks for stopping by!


Sunday, May 6, 2018

TGIF Challenge: #tgifc158

Hello there!  Today as I was sitting at my desk trying to find some inspiration- I happened across the TGIF Challenges blog.  This week they are having a color challenge featuring one of my favorite color combinations so I figured I'd play along!


My card features a stamp set from the upcoming 2018-2019 Stampin' UP! Annual Catalog.  This stamp set was created by Million Sales Achiever Mary Fish.  I adore this sweet stamp set/coordinating punch and can't wait for you all to be able to order it!


This isn't an overly fancy card but sometimes less is more!  I love how it turned out.  I'm using the Petal Passion DSP as much as I can before it retires.  It is my favorite ❤

Thanks for stopping by!  Wanna play along with the TGIF Challenge?  Click the TGIF Challenges image above to visit their site.


A quick update...

Hey there!  I wanted to post a quick update and let everyone who ordered in the month of April know that I have finished my thank you gifts and they are going out in the mail tomorrow morning!  There were lots of Pineapples to make!  Thank you all so much for your continued support!  I truly appreciate each and every one of you!


Happy Stampin'!

Tuesday, May 1, 2018

Create-A-Card Challenge

Hey there stampers!  Tonight I'm back to share the card I created for our team challenge at Y-Knot-Stamp-Everything.  Our team leader Suzie Barnes sent us all a kit that contained a few samples of the Share What You Love DSP, coordinating colored card stock to match the DSP, and some Pear Pizzazz Shimmer Ribbon.  We were asked to use the enclosed supplies along with our own stamps & inks to create a card.  We were then to post a picture on our team FB page or email Suzie a picture of it before 5/20.  Wanna see what I made?


I chose to create a 4" square card.  I distressed the edges of the DSP using my paper snips.  Then I wadded it up as though I was going to throw it away.  I crumpled it over and over and over until it was full of rips and creases.  It was perfectly imperfect!  

I then added a series of embellishments and various other elements to make it complete.  Unfortunately the picture doesn't properly show the Wink Of Stella that has been applied to the watercolored Rich Razzleberry flowers.  It truly is beautiful ❤

Did you know that YOU can order the products from the Share What You Love product suite?  That's right!  They went on sale TODAY!!!  It's an Early Release from the upcoming 2018-2019 Stampin' UP! Annual Catalog.

Thanks for stopping by!