Friday, December 29, 2017

A Card for Someone Special.....Sara!

Good afternoon! The card I'm sharing tonight was created for a very special person.  Sara Douglass.  AKA the CEO of Stampin' UP!  Earlier this fall the Artisan Design Team was invited to create a card for Sara that would be displayed in the Legacy Room at Stampin' UP!   I wanted to create something that was really special because let's face it- Sara is pretty amazing.   I was so worried about how my card would turn out.  Would it be special enough?  Would Sara like it?  Would it be worthy of the Legacy Room?  I had all these questions racing through my mind and no answers!  

Can you guess which one is mine?


I was SO excited to create this card.  I mean after all black, white and little splashes of color are my idea of the perfect card!  So the challenge was accepted and this is what I created!
I began with a standard A2 Basic Black card base.  I then added a Whisper White/Basic Black striped layer.   Next- I created my favorite part of the card....the Berry Burst ribbon rose with Lemon Lime Twist leaves.  I layered it all upon a Delicate White Doilie, added a square Vellum frame and various other embellishments and BAM!  Done!


Here's a closeup of the Berry Burst Ribbon Rose.  Isn't it gorgeous?  It measures approximately an inch and a half in diameter possibly a little larger.  I can't remember exactly  but it was pretty good sized.
To create the sentiment- I stamped the You're Just Lovely stamp from the Oh So Eclectic Stamp Set 3 times.  Why 3 times you ask?  Simply because the sentiment is actually in a stack on the stamp- meaning that each word is on it's own separate line. To create the look I wanted- I needed to stamp the sentiment in two straight lines.  Thankfully the Stamp-A-Ma-Jig came to the rescue!

Overall I love this card.  It's beautiful and totally my style!  I love everything about it!  I hope you have enjoyed my card!

Sunday, December 17, 2017

Monday Montage #106


Hello there and welcome back for the bi-weekly Monday Montage blog hop. I'm so happy you joined us!  Be sure to visit all 9 stops to see what other amazing designers have created to share with you.

A quick heads up- tonight will be our final hop for 2017.  We will pick up again just after the New Year on Sunday January 7th 2018!


My project tonight is a gift bag that was created using two sheets of 12" x 12" Designer Series Paper.  These bags are really simple to create and are extremely durable.  This makes them perfect for all kinds of gifts!

Here's a closeup of the front of the bag.  It's a little difficult to see in the pictures- but for the shiny layer behind the tree I used the Champagne Foil Sheets and the Silver Metallic Thread.  I then layered a tree cut from the Christmas Staircase Thinlits Dies and a piece of Gold Glimmer Paper.  The sentiment is embossed with VersaMark and the Copper Stampin' Emboss Powder.


Do you use Designer Series Paper to create gift bags or gift wrap?  If not you totally should give it a try!  You will LOVE the results!


Won't you join us for the rest of the hop?  Simply click the NEXT button to go to the fabulous Elizabeth Price or click the BACK button to head on over to the lovely Cathy Casey.  Thanks for stopping by!


Thursday, December 14, 2017

Fancy Friday Blog Hop- Mixed Metallic Challenge


Hello there stampin' friends!  Tonight I'm hopping along with the Fancy Friday Design Team!  I am thrilled to be able to hop with such an amazingly talented group of ladies! 

For this hop- we are having a Mixed Metallic Challenge.  Let me just start out by saying that I love metallics.  There's no other way to put it!  They are gorgeous.  Every single color- whether it be gold, silver, copper or champagne- they all add a "little something" that just makes projects special.  
Tonight's card is just that!  Special!  


To create this card- I began with two pieces of Window Sheets that measure 4" x 5-1/4" and a piece of 3-7/8" x 5-1/8" of Year of Cheer Designer Series Paper (I used the sheet with snowflakes).  I then sewed the Window Sheets together leaving an opening at the top so that I could insert the DSP and the Metallic Sequins.  I then sewed the pocket shut.  The rest was just some simple layering and embellishing!

Thanks for stopping by!  I hope you have enjoyed my project!  Please click the NEXT button below to be taken to one of my stampin' heroes- Cindy!  There are several fabulous artists in this hop so please continue to click NEXT to travel along with us!  You'll be happy you did!


SaveSave

Stampin' UP! Artisan Design Team Blog Hop- Merry Cafe Treat Tubes

Hey there stampers!  Welcome back to another Stampin' UP! Artisan Design Team Blog hop!  If you are hopping with us today then you may have arrived here from the fabulous Cathy Caines.  Isn't she amazing? As we are a group of 20 demonstrators from around the world- our blogs are written in many different languages.  Please be sure to use Google Translate so that you can follow along in your language.  You don't wanna miss out on any of the fabulous details!

Our hop today features the Merry Cafe Stamp Set and coordinating Coffee Cup Framelits Dies.  I just love this set!  It is so versatile and fun!  A few short months ago I created a set of four cards that was showcased on the Stampin' UP! Corporate Blog.  If you missed them- you can head on over to the Stampin' UP! Corporate Blog and check them out! (You may need to do a quick search to find them).

One of my favorite products in the Holiday Catalog is the Treat Tubes.  Some may think that these tubes were made for Halloween but I say they are for every season!  Especially when these little cuties are paired with the Merry Cafe Stamp Set!


Sadly I only have one picture of them.  It seems I couldn't wait to give them away!  I had made a bunch of these little holiday favors for my coworkers at my day job.  These treats are a card and a treat all combined into one!  Perfect for quick gifts!


Today is our last hop as the 2017 Artisan Design Team.  Although I'm sad to say goodbye- I'm very excited to introduce you to the new 2018 Artisan Design Team.  I know they will have lots of inspiration to share with you all throughout the coming year so I hope that you will continue to follow along with their hops!  As for me- I'm not going anywhere! I'll still be posting to my blog as well as a few other places.  I'm happy to now be a part of the Fancy Friday Design Team as well as the OSAT Blog Hop Team.  Please watch for these hops coming soon!

ARTISAN DESIGN TEAM 2018

United States
Connie Collins (returning)
Canada
Cathy Caines (returning)

United Kingdom

France

Netherlands

Germany
Sylwia Schreck (returning)

Austria
Jessica Winter (returning)

New Zealand
Susan Wong (returning)

Australia
Jennifer Frost (returning)

Thanks for stopping by!  I hope you will join us on our journey around the world today!  The fabulous Holly Stene will be your next stop on the hop.  Check it out!  She has a gorgeous project in store!


Tuesday, December 5, 2017

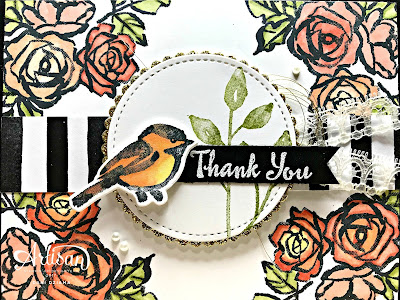
Sneak Peek! Petal Palette

Good evening stampers!  It's been nearly a month since I received my Occasions Catalog preorder and can you believe that I literally just opened it?   I've been in full swing craft show mode so I haven't really had much time to play with my new goodies.  Until now.  

The first set I chose to use was the gorgeous new stamp set called Petal Palette.  This stamp set is absolutely amazing.  There are tons of sentiments and lots of fancy images.  There is coordinating black and white Designer Series Paper called Petal Passion and I am in love.  I absolutely adore black and white DSP.  It's so versatile and it truly makes classy projects!

As I sat down to play- I grabbed the rose stamp and stamped it in all four corners.  Using the Stampin' Blends I began to color all the images in.  My rose color combinations consisted of Light Daffodil Delight, Light Pumpkin Pie, Light Calypso Coral,  Dark Calypso Coral and the Color Lifter.  The leaves were colored with both Light and Dark Old Olive Stampin' Blends.  
Each rose was colored just a little bit differently to allow for varation.


I'm thrilled that there's black and white striped DSP!  It's so beautiful ❤  
I used the Layering Circles Collection Framelits and the Stitched Shapes Framelits to create the circle centerpiece.  The sentiment was stamped in VersaMark Ink onto a piece of Basic Black Card Stock and heat embossed in White Stampin' Emboss Powder.


A tiny piece of Lace Trim  and some Gold Metallic Thread to add interest.  Pearl Basic Jewels were added for a bit of "extra".  


I hope you have enjoyed my project for tonight! Thanks for stopping by!

Thursday, November 30, 2017

Stampin' UP! Artisan Design Team Blog Hop- Color Me Happy

Hey there stampers!  Welcome back to another Stampin' UP! Artisan Design Team Blog hop!  If you are hopping with us today then you may have arrived here from the fabulous Cathy Caines.  Isn't she amazing? As we are a group of 20 demonstrators from around the world- our blogs are written in many different languages.  Please be sure to use Google Translate so that you can follow along in your language.  You don't wanna miss out on any of the fabulous details!

For our hop today, I have chosen to create with the Color Me Happy Project Kit and coordinating Color Me Happy Stamp Set.  This project kit is actually intended to create a set of 16 cards (4 each of 4 designs).  Since the card bases in the kit come pre printed with different patterns- they're perfect to use as designer series paper.


To create my card- I began with a 4-1/4" square Pink Pirouette card base.  I chose Watercolor Paper for the top layer as it adds texture to the card.  Using the Sweet & Sassy Framelits Collection, I created a series of hearts.  Each heart was layered onto the card using Stampin' Dimensionals.  A border was sewn and the edges of the Watercolor Paper were distressed using Paper Snips.


As you can see- I've added some of my favorite embellishment- Gold Metallic Thread.  A little bit harder to see in the picture is the Clear Wink of Stella splatter all over the watercolor layer.  This adds a little bit of shimmer!


Thanks for stopping by!  I hope you will join us on our journey around the world today!  The fabulous Holly Stene will be your next stop on the hop.  Check it out!  She has a gorgeous project in store!


Monday, November 27, 2017

Mini Self Close Box Tutorial

Hey there stampers!  I had numerous requests via email, from my blog and on Facebook to do a tutorial for the adorable Mini Self Close Boxes I created for the Monday Montage Blog Hop last night.  So here it is!  Please let me know if you have any questions creating them!


Please click HERE for the free PDF Tutorial. 

Thanks for stopping by!


Sunday, November 26, 2017

Monday Montage #105


Hello there and welcome back for the bi-weekly Monday Montage blog hop. I'm so happy you joined us!  Be sure to visit all 10 stops to see what other amazing designers have created to share with you.

Do you love miniature things?  I do and I've been trying to figure out what I could make that would accommodate two Hershey Kisses.  Well- a Hug and a Kiss to be exact.  These adorable little self closing boxes are perfect!  You can adjust the size to hold pretty much anything!  This is not my original idea- I was browsing Pinterest for inspiration when I came across a self closing box that Jana Trautmann created. I then altered her measurements to create one that would hold two kisses.


Aren't they adorable?
I used the 6" x 6" Quilted Christmas Designer Series Paper to create these little cuties.  The Santa's Suit stamp set has the perfect sentiment for the front.  The Holly Berry Happiness stamp set and coordinating Holly Berry Builder Punch were also used to embellish these boxes.  


It's a little difficult to gauge the size of these without seeing them in person.  They are roughly 2-1/2" tall and the box base is 1".  If there's enough interest- I may create a mini tutorial showing how to create these for yourself!  They really are adorbs!


Won't you join us for the rest of the hop?  Simply click the NEXT button to go to the fabulous Elizabeth Price or click the BACK button to head on over to the lovely Cathy Casey.  Thanks for stopping by!


November 2017 OnStage Display Stamper

Good evening stampers!  Who wants a sneak peek?  Today is the last day of sharing the gorgeous samples I created for the display boards at OnStage.  My samples will feature three different stamp sets, a few new Designer Series Papers, a new ribbon and some new punches.  Please be sure to check back daily for the newest post!  You won't want to miss out!

My cards tonight feature a sweet stamp set called Fruit Basket.  This stamp set is filled with fruit images, a bowl, a basket (which I have turned into a blanket), and sentiments that all coordinate with fruit!

This card was super quick and easy to create.  Very little to it!  To create the bow on the bottom- I folded the 1/2" Night Of Navy Gingham Ribbon in half and tied a bow.  Cute!


 My next project is a mini treat holder that was created using the Envelope Punch Board.  It's perfectly sized to hold a couple Hershey's Miniature candy bars or a gift card!  Either will fit.


My last set of little treat boxes were some of my favorites!  They only take 1/2 sheet of a 6" x 6" piece of Tutti-Fruitti Designer Series Paper to create.  This makes them a great option when creating treats for a larger group.  Once again- I apologize for the picture...


Here is a picture of my entire Display Board.  You'll notice that I had created a beautiful LOVE banner.  Unfortunately I didn't get an individual picture of it.  There's also a few other items that I didn't post individually due to lack of pictures.  Thank you so much for hopping with us this past week!  It's been fun to share all of our amazing projects!

Please click the next button to continue along our hop!  There are several other Display Stampers with gorgeous projects to share!


Saturday, November 25, 2017

November 2017 OnStage Display Stamper

Good evening stampers!  Who wants a sneak peek?  Over the next 2 days I will be sharing the gorgeous samples I created for the display boards at OnStage.  My samples will feature three different stamp sets, a few new Designer Series Papers, a new ribbon and some new punches.  Please be sure to check back daily for the newest post!  You won't want to miss out!

My cards tonight feature a sweet stamp set called Fruit Basket.  This stamp set is filled with fruit images, a bowl, a basket (which I have turned into a blanket), and sentiments that all coordinate with fruit!


For the Fruit Basket Stamp Set- it is part of a suite called Tutti-Fruitti and it's adorable!  There's a fun 6" x 6" Tutti-Fruitti Designer Series Paper Stack which has LOTS of fun summer colors!  As you can see from my card above- the Real Red card base with the watermelon DSP really pops!  It's totally cute paper!  As I mentioned above- the red blanket is actually a wire basket stamp turned upside down.  The pear images were punched out using the brand new Itty Bitty Fruit Punch Pack which is a pack of 4 mini punches.  

My second card was created with the same product suite as the first card.  The strawberry paper is my favorite.  It's so cute!


See that cute little ribbon?  That's the new Night of Navy 3/8" Corduroy Ribbon.  This new ribbon is AMAZING!  It's so velvety soft and it ties really well!  I wish it came in many colors!
Thanks for stopping by!  I hope you have enjoyed my projects for tonight!

Please click the next button to continue along our hop!  There are several other Display Stampers with gorgeous projects to share!


Friday, November 24, 2017

November 2017 OnStage Display Stamper

Good evening stampers!  Who wants a sneak peek?  Over the next 3 days I will be sharing the gorgeous samples I created for the display boards at OnStage.  My samples will feature three different stamp sets, a few new Designer Series Papers, a new ribbon and some new punches.  Please be sure to check back daily for the newest post!  You won't want to miss out!


Does anyone else love non-traditional Christmas cards?  The Perennial Birthday stamp set totally makes this possible!  To create this card- I began by stamping the leaf /bud image around in a circle to create the wreath. Then- using the leaf stamp- I added more leaves to fill in the open space.  I used the dots image stamped in Berry Burst ink to create my non-traditional holly berries.


Simple yet pretty!
I apologize for the not so great picture but as I explained in an earlier post- I gave my Display Stamper samples away so I'm not able to re-take the picture.  

Thanks for stopping by!  I hope you have enjoyed my projects for tonight!

Please click the next button to continue along our hop!  There are several other Display Stampers with gorgeous projects to share!


Thursday, November 23, 2017

November 2017 OnStage Display Stamper

Good evening stampers!  Who wants a sneak peek?  Over the next 4 days I will be sharing the gorgeous samples I created for the display boards at OnStage.  My samples will feature three different stamp sets, a few new Designer Series Papers, a new ribbon and some new punches.  Please be sure to check back daily for the newest post!  You won't want to miss out!


My samples today showcase the Perennial Birthday Stamp Set and a mix of several other new products.   

The Perennial Birthday Stamp Set is just amazing.  There are so many possibilities for just about any project.  As I said yesterday- it's designed to coordinate with a kit however it works just fine on its own.  


To create this card- I began with a subtle Soft Sky watercolor wash.  After the watercolor wash was dry- I stamped the dots image in Soft Sky ink onto the wash for a tone on tone look.  The flowers were inked using the 2017-2019 In Color Stampin' Write Markers (I used Berry Burst and Lemon Lime Twist).  


My second card tonight is one of my favorites.  There's just something fabulous about black and white striped paper.  I LOVE it...and when it's paired with Berry Burst and Lemon Lime Twist- how can it go wrong?


To create this card- I stamped the cluster of hearts from the Heart Happiness Stamp Set into VersaMark ink and then heat embossed using Gold Stampin' Emboss Powder.  
I then created a collage from a mix of random ribbons, papers and other embellishments.  
The ribbon rose was created using the Berry Burst Finely Woven Ribbon.  The picture above isn't the best but trust me when I say that this card is truly gorgeous in person!

Thanks for stopping by!  I hope you have enjoyed my projects for tonight!

Please click the next button to continue along our hop!  There are several other Display Stampers with gorgeous projects to share!


November 2017 OnStage Display Stamper Blog Hop

Good evening stampers!  Who wants a sneak peek?  Over the next 5 days I will be sharing the gorgeous samples I created for the display boards at OnStage.  My samples will feature three different stamp sets, a few new Designer Series Papers, a new ribbon and some new punches.  Please be sure to check back daily for the newest post!  You won't want to miss out!


My samples today both show how beautiful the new Perennial Birthday Stamp Set is. The stamp set itself was designed to coordinate with the Perennial Birthday Project Kit however I am featuring only the stamp set.  

One of my favorite stamps in the set is a flower.  I love that the flower can be layered one on top of the other and appear as though there are leaves on both sides.  


For the card above- I created a small wreath using only one stamp.  The image is curved making it easy to stamp in a round wreath shape.  The flower was created by stamping 2 flowers and then adhering them together.  


There are several smaller floral and leaf images in the Perennial Birthday Stamp Set.  These smaller flowers/leaf images make great tone on tone backgrounds.  They will also make great floral scenes!

I hope you have enjoyed my projects for tonight!

Please click the next button to continue along our hop!  There are several other Display Stampers with gorgeous projects to share!